Using Pearl Laser

Moving thread here since we’re not talking about blue

Pearl is ready there as a backup, in fact it’s a straight 100W and a faster machine. It is functional but needs exhaust hose hooked up last I saw. The print interface looks a bit different, but it’s cosmetic- they’re both ULS machines, and the print interface is mostly a 1:1 equivalent to how Blue’s works.

The honeycomb in Blue can go into Pearl if Blue isn’t available.

Meanwhile, Pearl is ready to take jobs if it’s from Illustrator, I don’t see where Corel was installed. We are adding Lightburn to this and that’s part of our new unified toolchain.

Pearl is a straight 100W, so it’s actually quite an upgrade. There is a rotary jig available for use too.

The actual use is equivalent to Blue, the print driver is laid out a bit differently but it’s mostly cosmetic.

1 Like

I see Pearl has exhaust so I’m test running it now

We need the admin password on Pearl’s machine

I’m still waiting for confirmation from the email I sent that Pearl is 100% ready to go, ie regular bed is in, exhaust is good, a user can walk up with materials and start lasering. Once I have received that, I’ll add a slot in Skedda for Pearl.

Please note: we still need classes to be taught on rotary. This laser will be flatbed only until we have training for the rotary. Once rotary is being used, the laser should always be left in flatbed mode when finished, ie do not leave the laser set for rotary when leaving. This is highly likely to change once we have more lasers up and running, but for the time being this is how we will operate with Pearl.

1 Like

Thank you for all the help Danny.

Thank you Valerie. I’ll check Skedda for the update

Ok dumb question what does it take for Illustrator’s vectors to be seen as vectors on Blue?

.001 line width.

I’m seeing it in “pt” though, not inches

I have Lightburn installed. The thing is, it has no “line width” field, as it was designed as laser cutting software. When it prints and brings up the ULS print driver, all the vector content is getting interpreted as raster. Changing the layer from “RAST/VECT” to Vector results in the vector content just being omitted.

Illustrator, I am entering stroke width as the minimum 0.25pt (I don’t see how to go by ruler length), but it’s still interpreting vectors as a raster job.

That laser is quite powerful though, it went through the plywood entirely while using raster mode.

OK got it, had to change Illustrator units, and manually enter 0.001" as a line width.

Other than that, it’s AMAZING. The pulse laser looks crazy on the honeycomb. I don’t know how to post video. These cuts are really, really fast and CLEAN, even without air assist! I’m getting no soot transfer on bottom even on the old honeycomb.

1 Like

Setup:
Turn on chiller, wait for 22C which will take under 5 min and the chiller will auto-regulate there. The chiller must be on to run the machine. It’s not harmful to start running warmer, but its power is going to increase as temp drops and it will be inconsistent
Turn on the blower, currently with a switch on a power strip. There is no protection against not doing this, so don’t. Will make automatic pretty soon
Adjust your Z height when you put material in. More in next post

OK here’s the magic for Illustrator:
Illustrator->Edit->Preferences->Units->Stroke=Inches to enable Inch units

Change all vector lines to 0.001" stroke

In Illustrator’s print, use this:


Media size: DEFINED BY DRIVER
Orientation: PORTRAIT
Print Layers: ALL LAYERS
Placement: CENTER, right beside that enter X=0 Y=0
Scaling: DO NOT SCALE

If you set this differently, the job may shift a bunch in +/- X or Y, or may disappear off the workspace all together. The Preview window should appear correctly as shown, however if you did not select CENTER for PLACEMENT, it will shift your job when cutting but unfortunately will NOT appear differently on the Preview window.

“THE CATCH” of using Illustrator: every time you go to ULS’ “Setup” to change your power and print or save from there, Illustrator has been seen resetting the above fields. So, reselect Portrait, Placement->Center, and change offsets back to zero after visiting the ULS setup window. If anyone knows how to keep Illustrator from reverting like this, that would be great.

Universal’s print driver:
Pearl_printing
Familiar? Yes, exactly, except this is NOT an auto-Z in this system. It has a motor, but you just drive with the machine’s panel (“manually”) to your material’s thickness when you load your stock

2 Likes

Settings so far:
1/8" plywood 11% speed
0.2" plywood 8% speed
500 PPM- unlike Blue, PPI actually does something here because this is a non-CW pulse laser. Stick with 500PPI for now. It’s actually cutting so much better and the back is CLEAN!

2 Likes

So, Z is manual-only. It is not entered into the print driver, you need to jog manually there when you load your stock. Like Blue, the Z will remain wherever the last person set it, both mechanically and the panel will remember the Z coordinate even if the power is cycled.

You don’t need the stick, although you can. Simplest is:


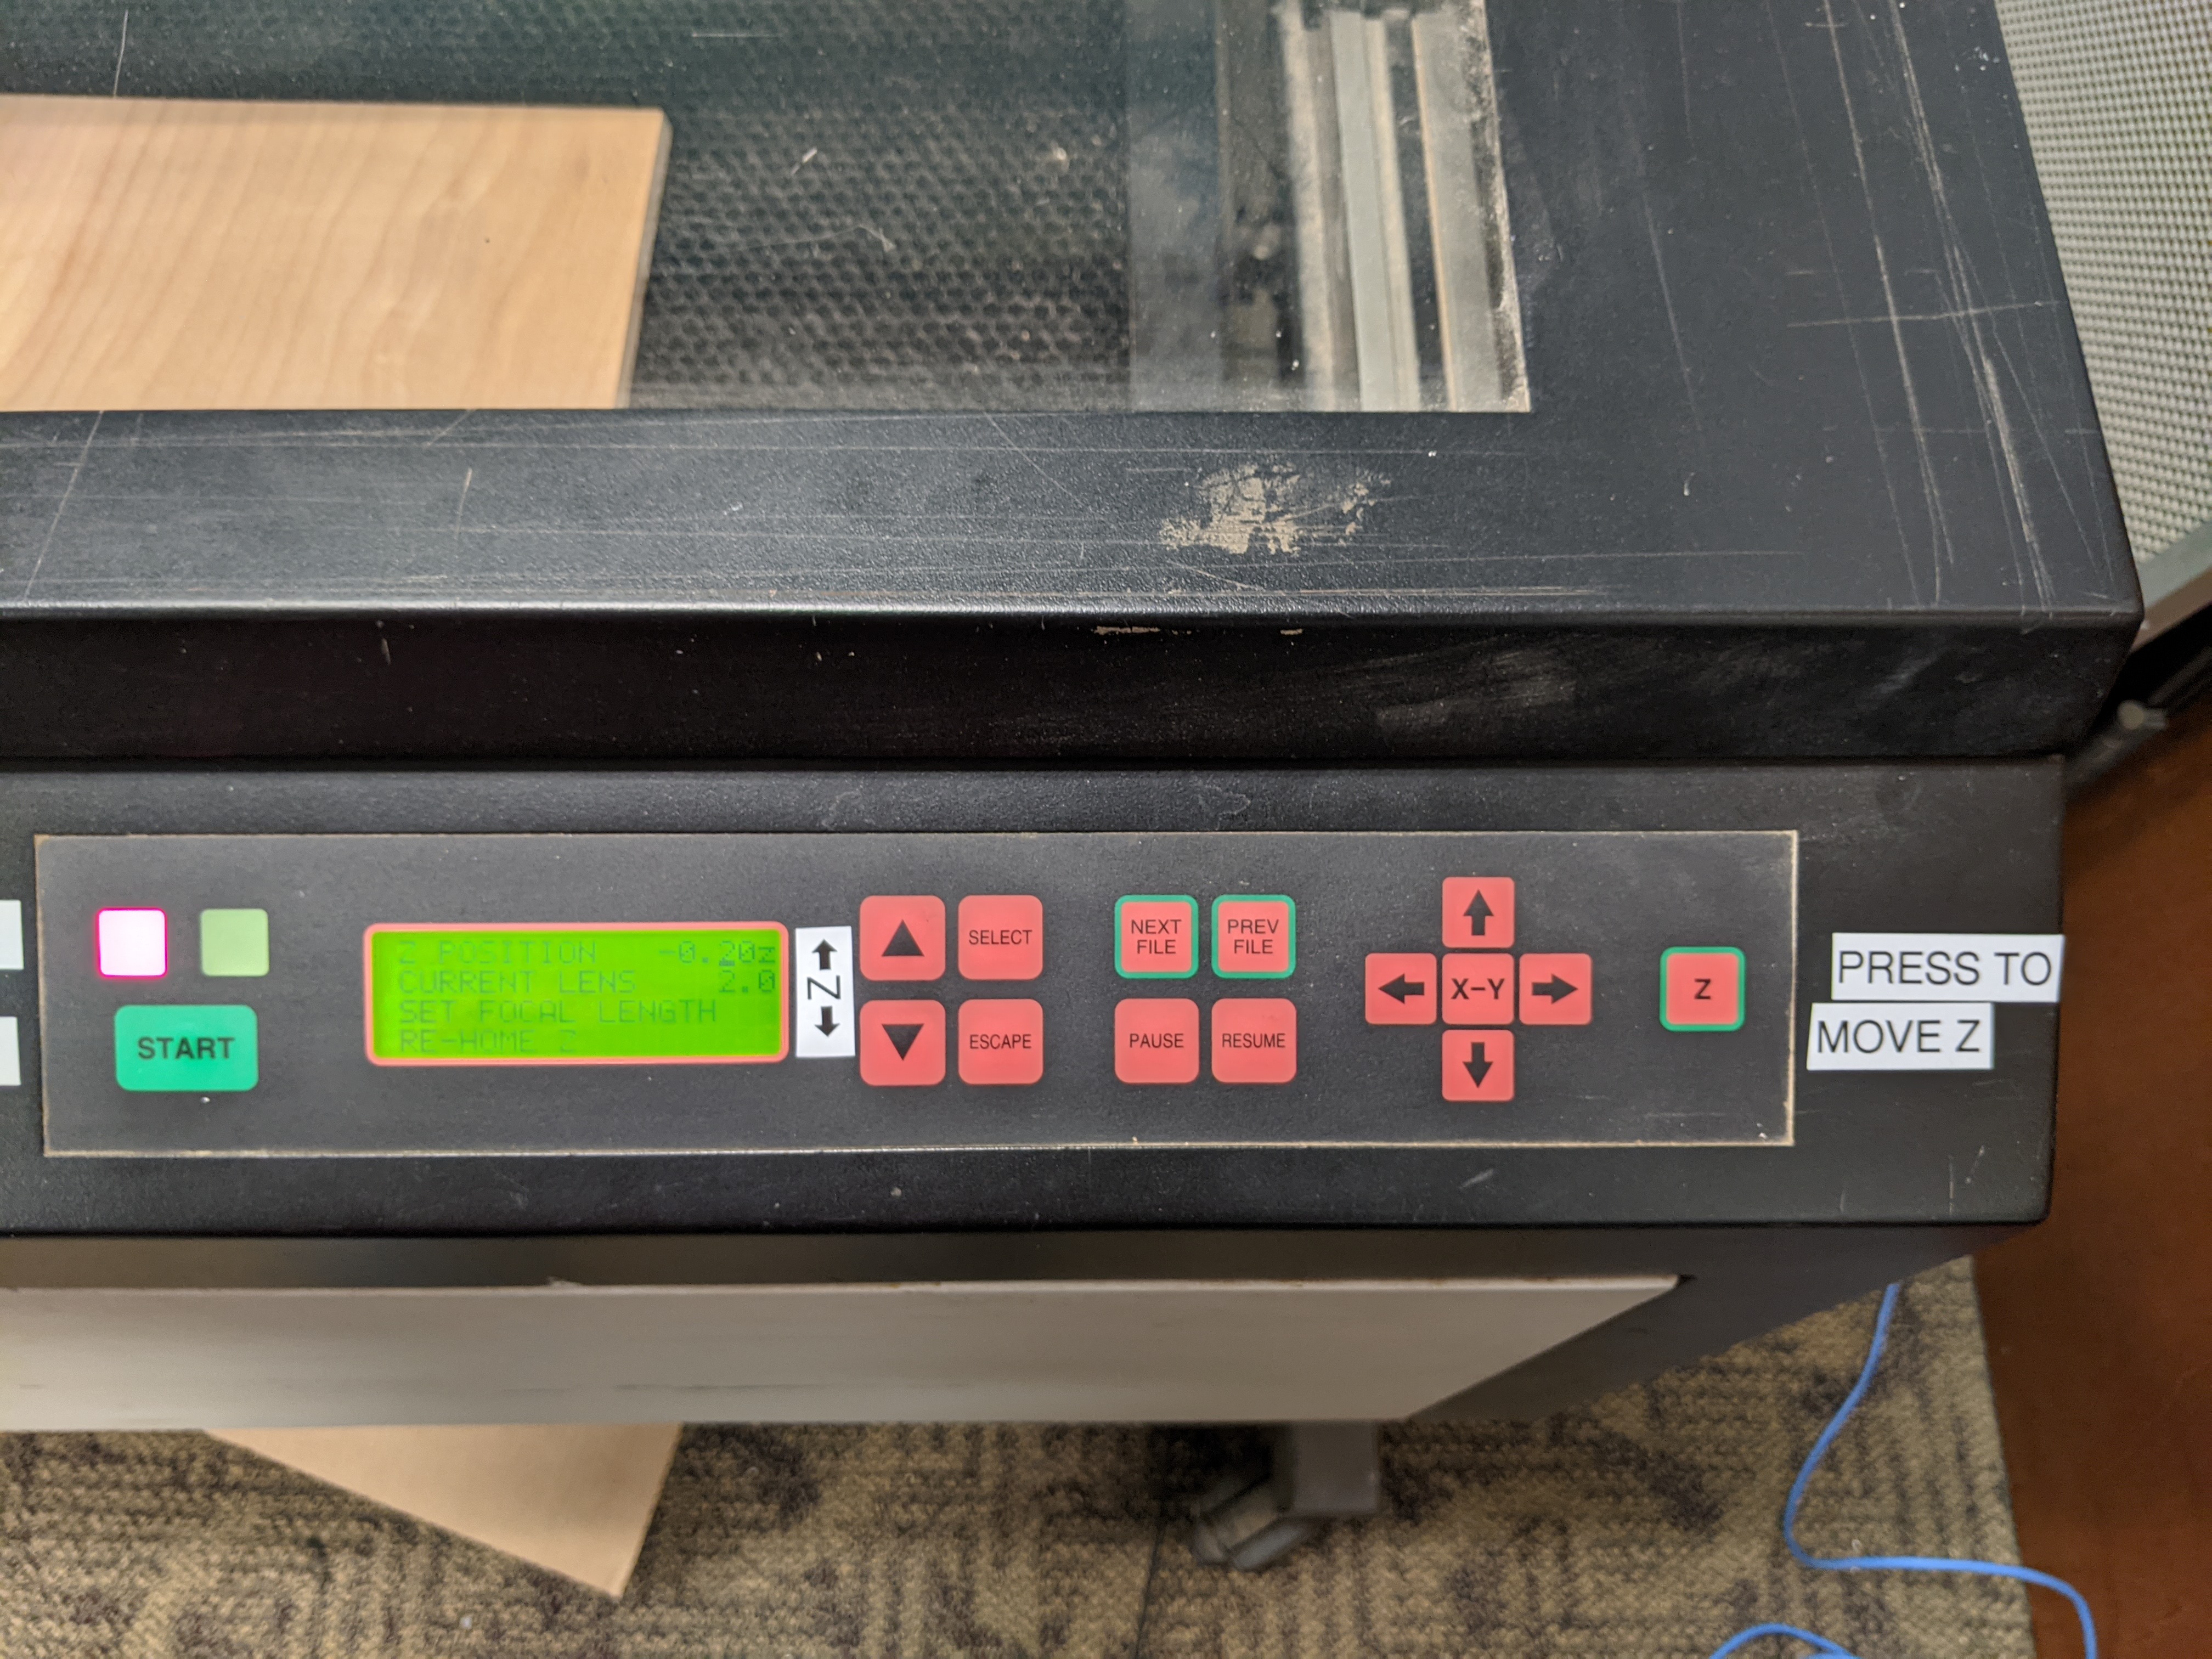
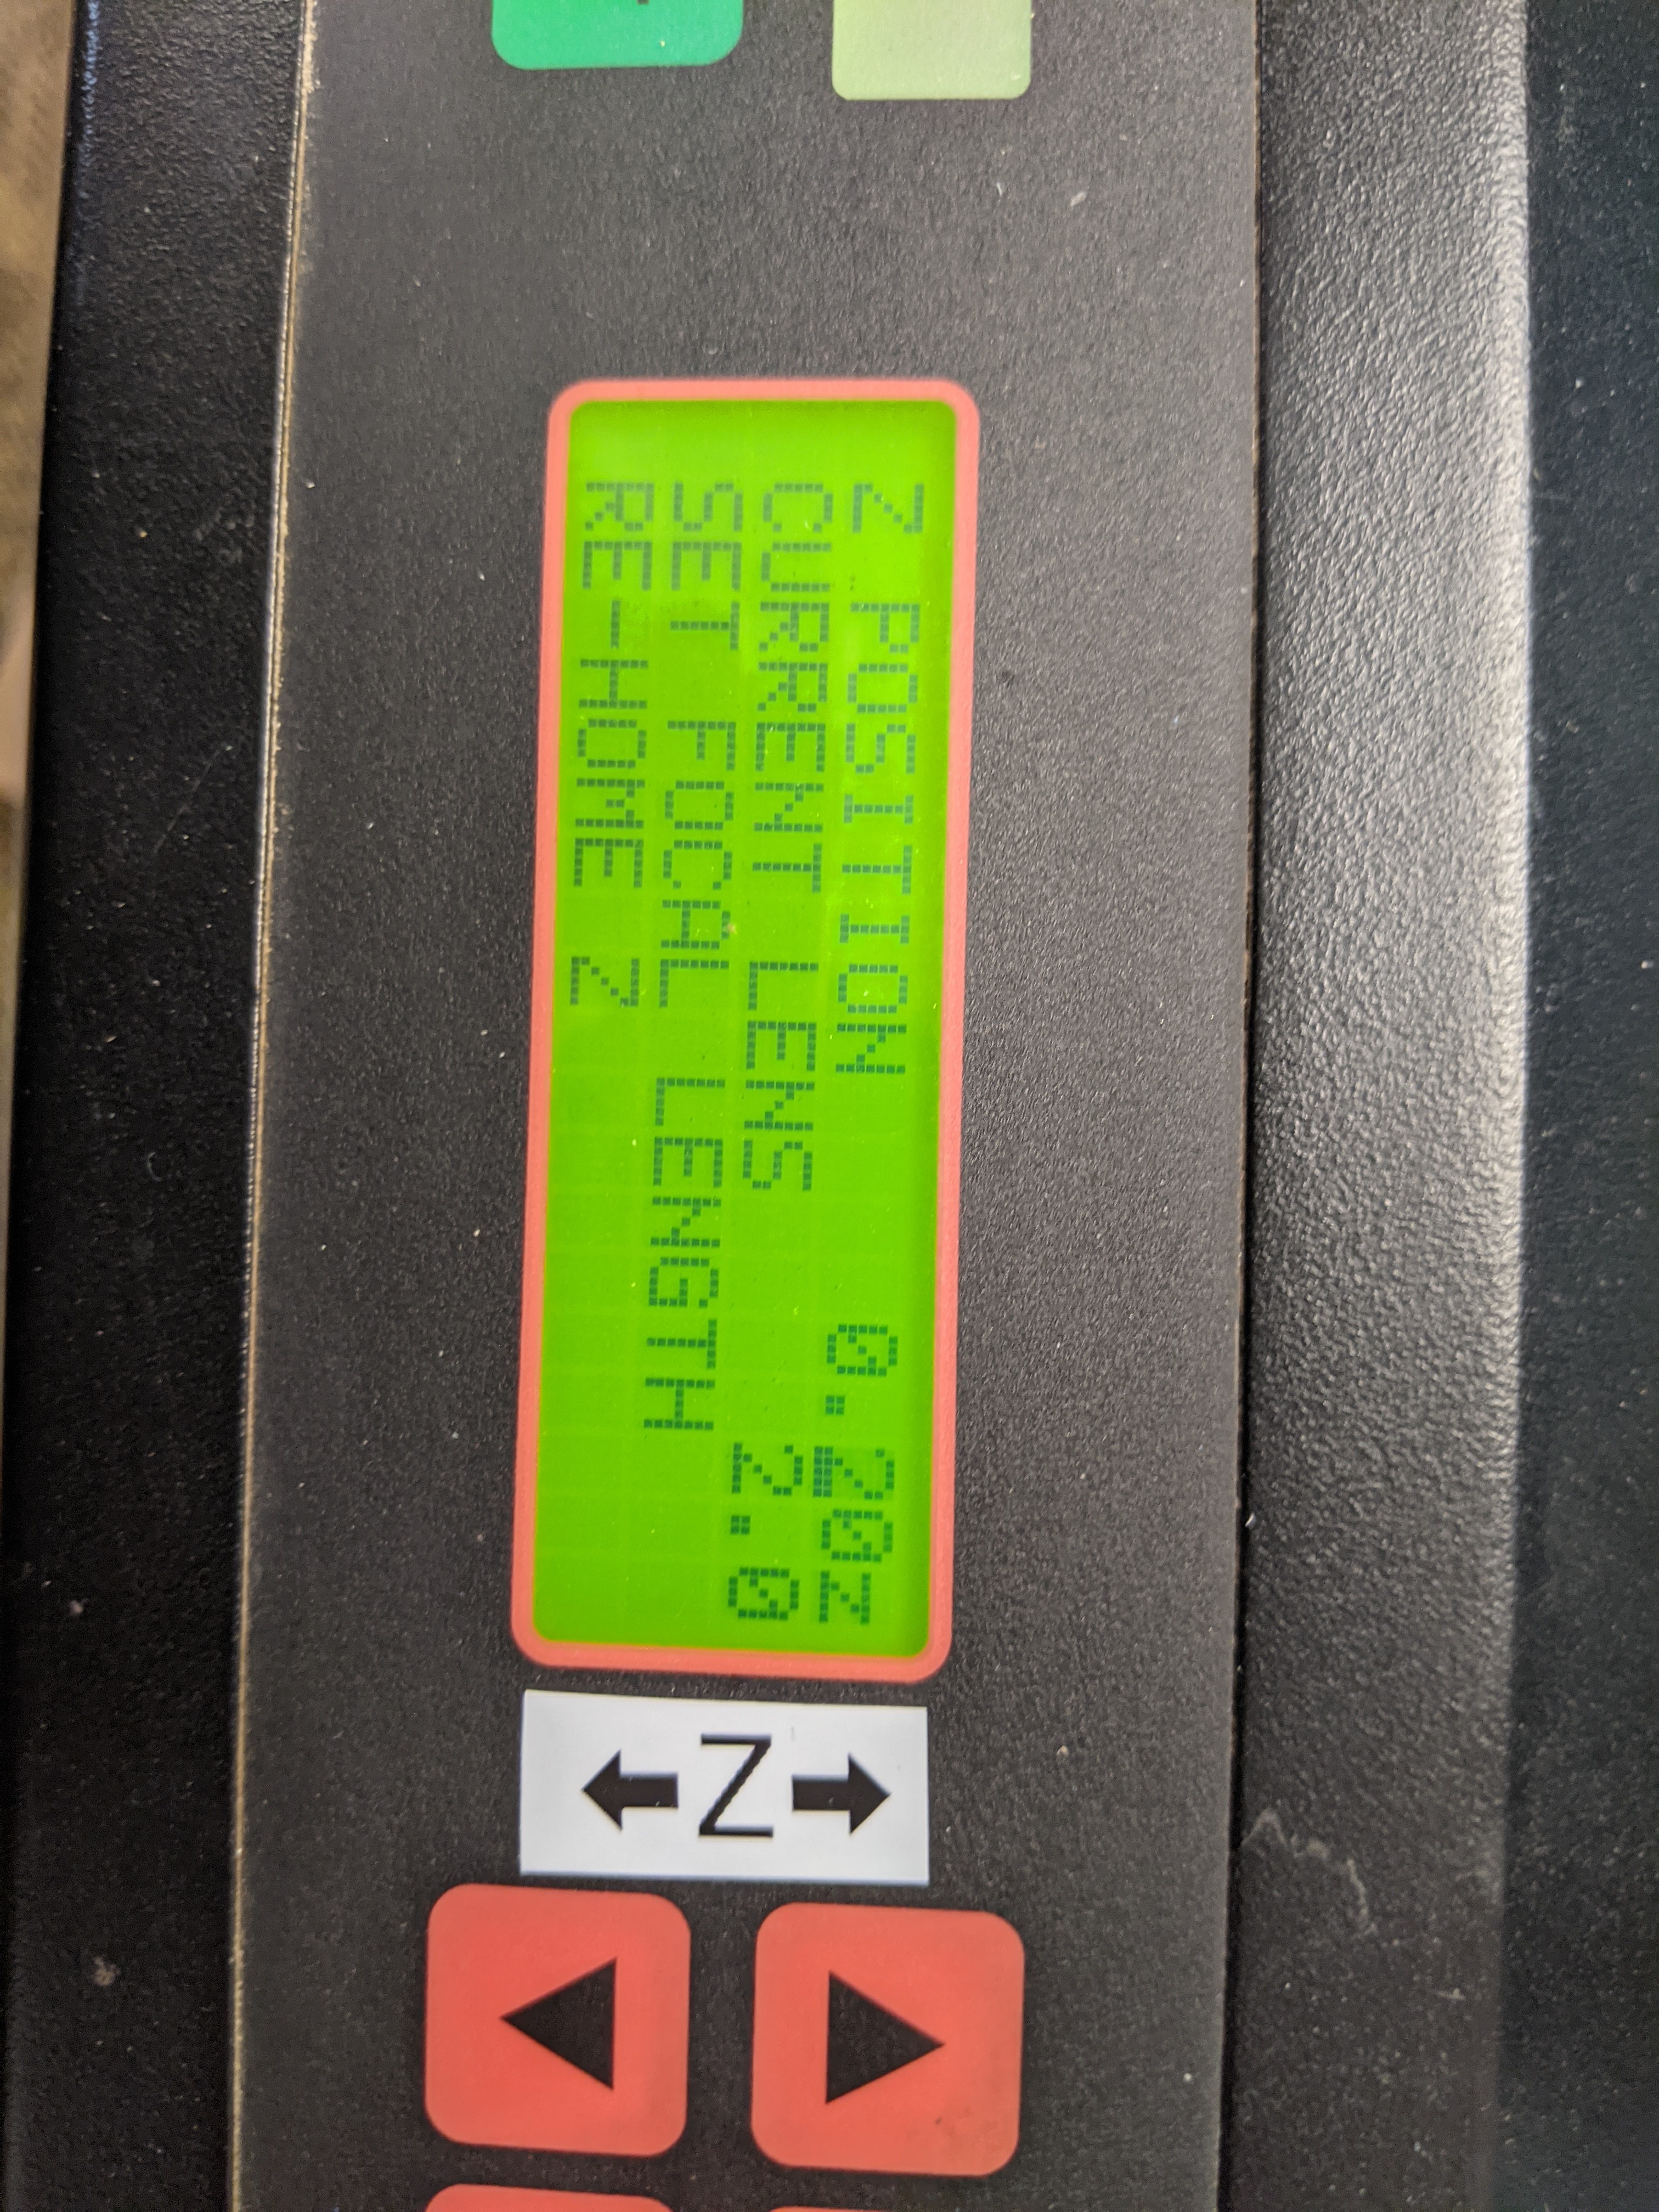
"Z Button" on right makes carriage jump to center and enables the Z UP/DOWN buttons. The XY 4-way arrows on the right still work and you can jog it anywhere if needed.

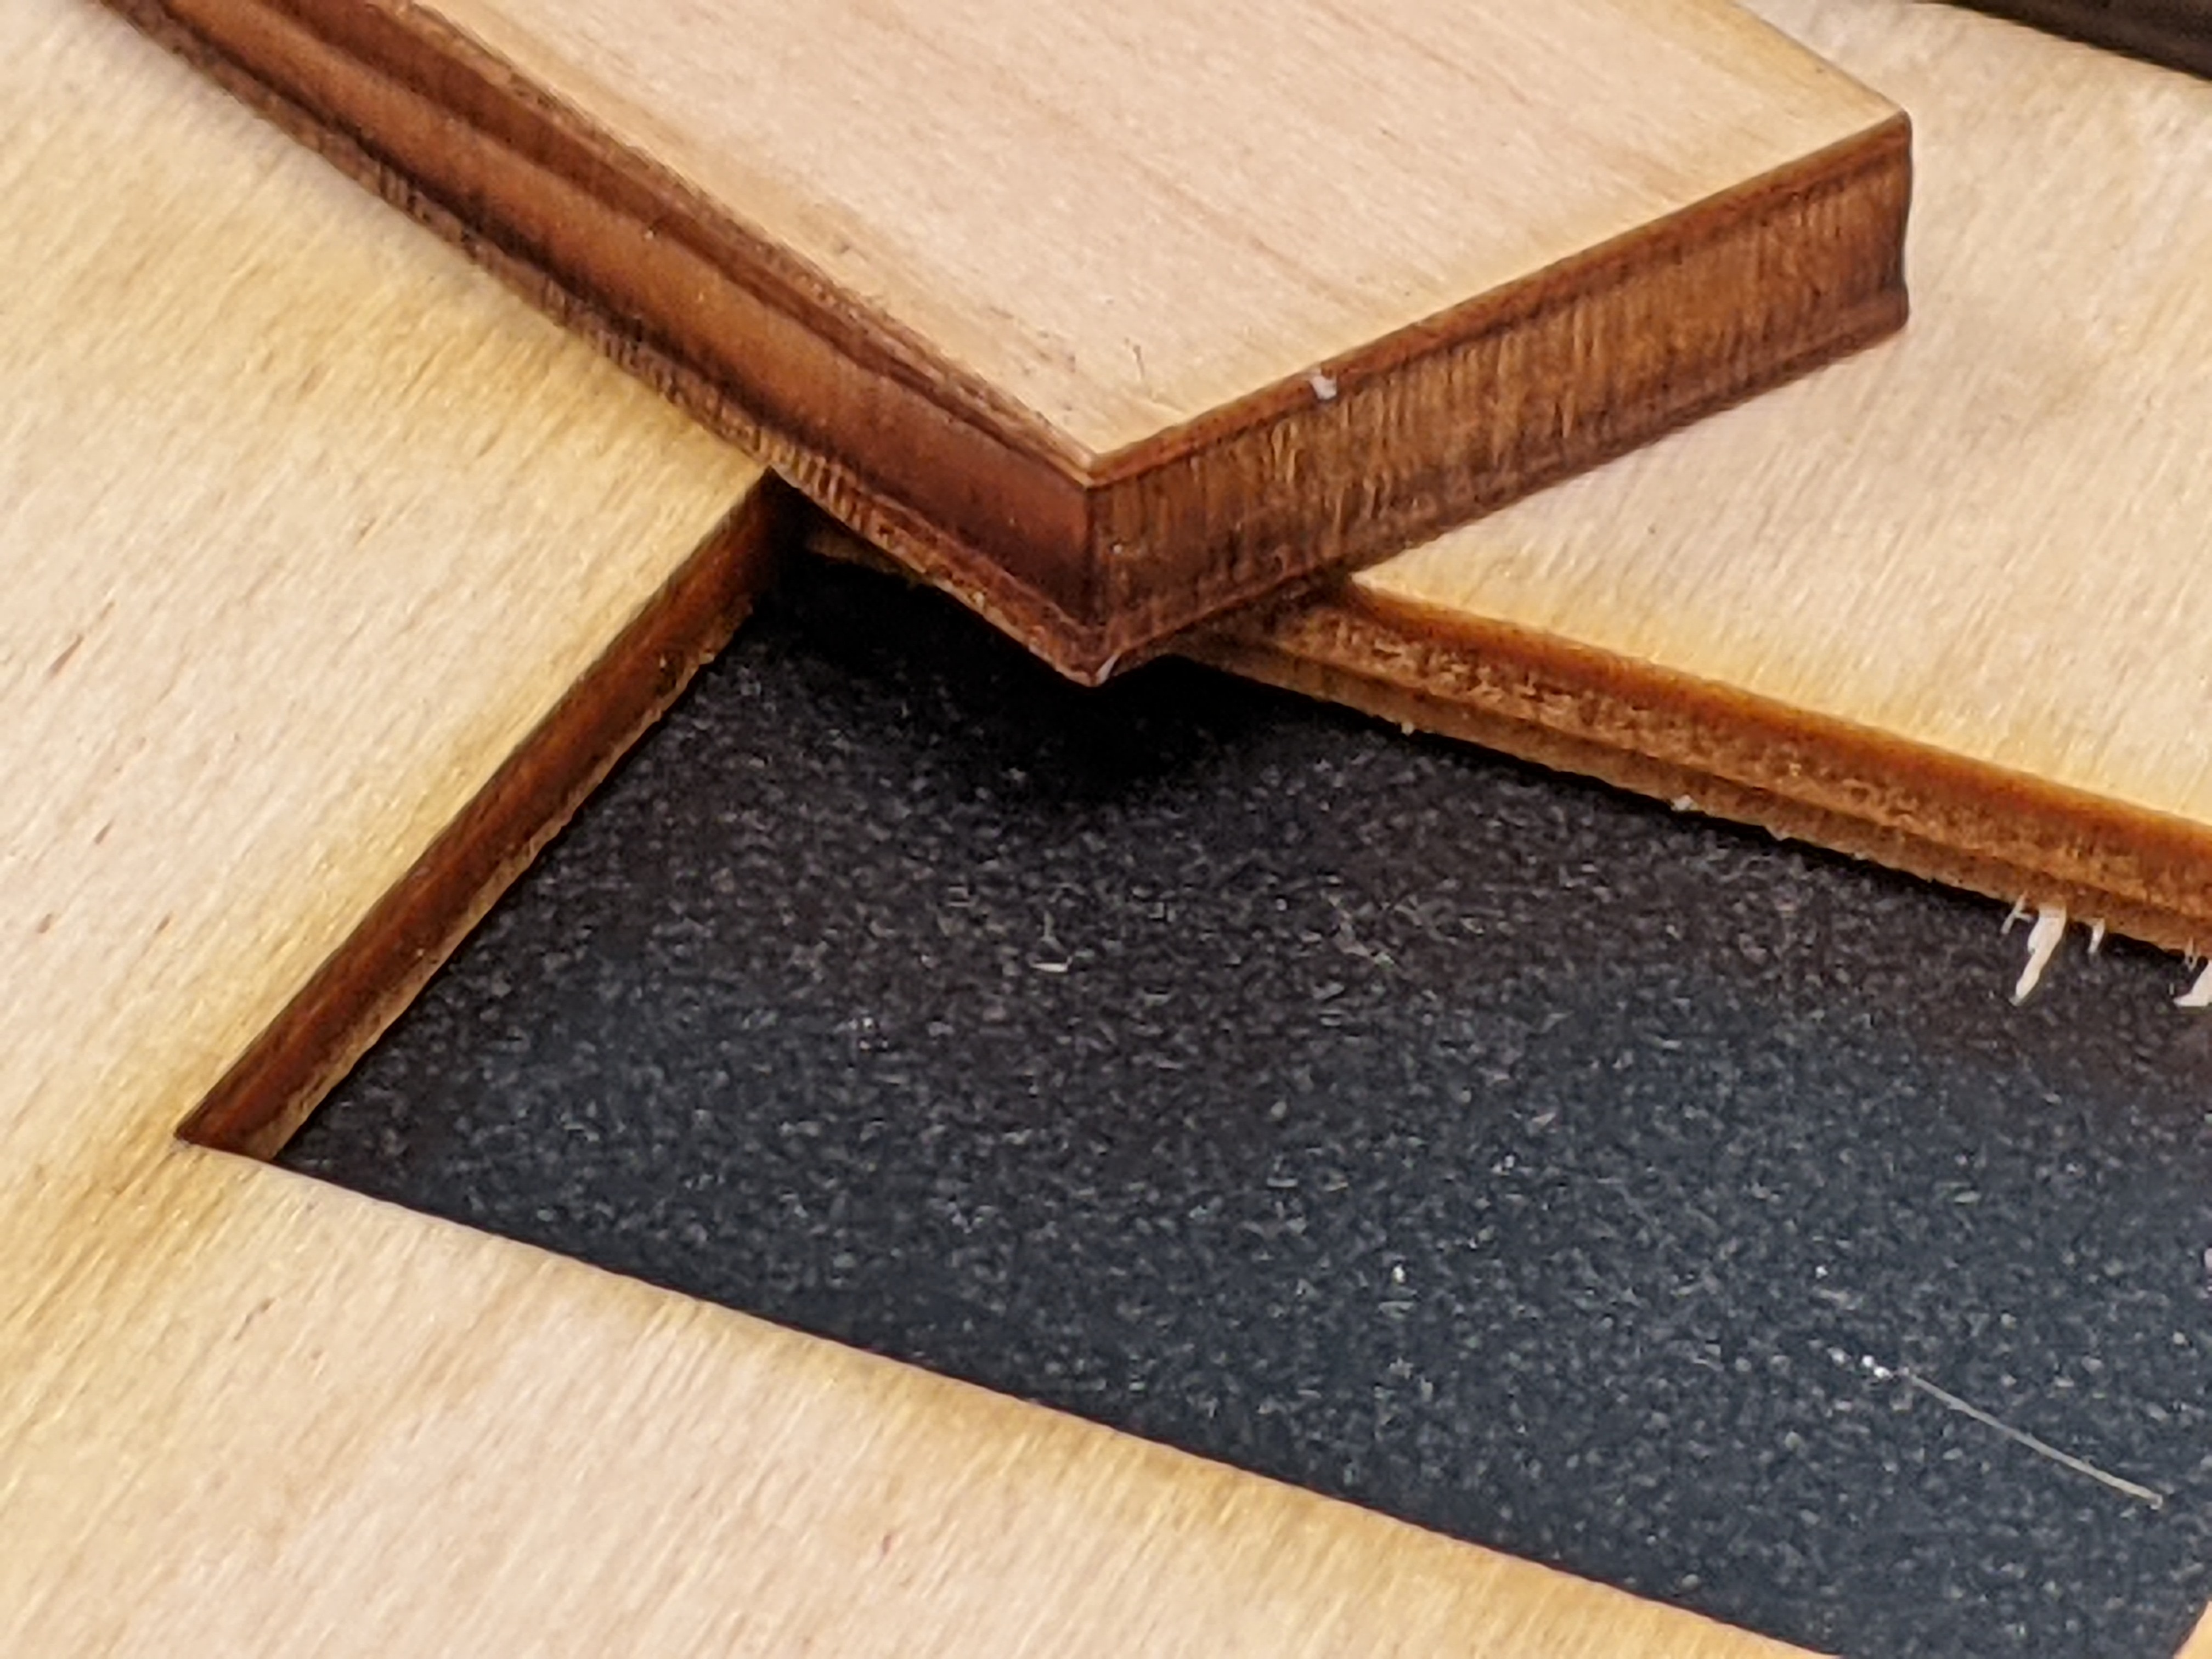
EDIT: The Z focal point is getting set to different values. I’m not sure why yet. Please jog to Z=0 and use the stick on the honeycomb (not your stock) to confirm focal length is within +/-0.1" of Z=0 at the midslope of the stick. If not go ahead and jog to the midslope of the stick and do “SET FOCAL LENGTH”.

Look on the display. Z-position=0 is the honeycomb. You press DOWN ARROW and make Z POSITIVE to lower the stock along with the bed. It’s using 0.1" steps and that’s still OK. So for 0.25" thick material, it will read “0.20” DO NOT ADJUST FOR NEGATIVE Z

YOU DO NOT NEED TO “RE-HOME Z”.

DO NOT “SET FOCAL LENGTH”. (unless the focus was off as above and you are correcting) That is resetting the focus calibration and if it’s changed we have to reset with the stick. By people who understand sticks.

Press the Z button on the right again to exit Z adj.

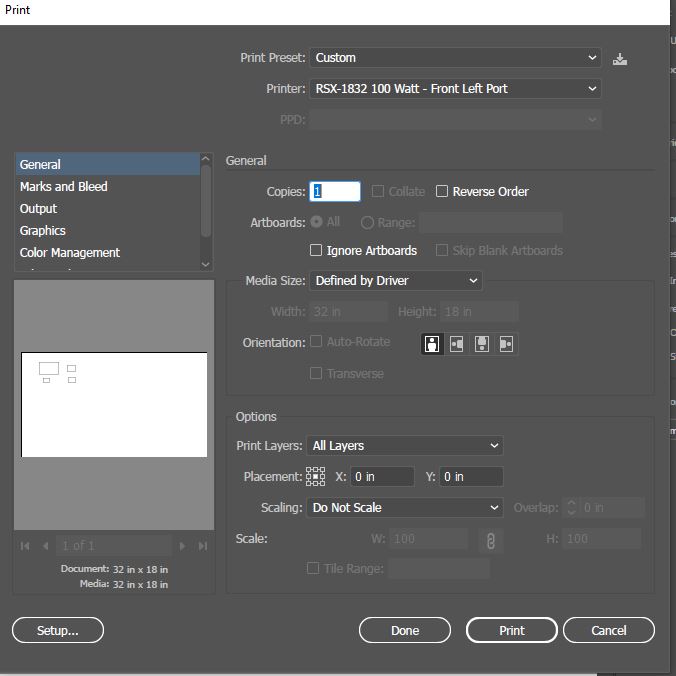
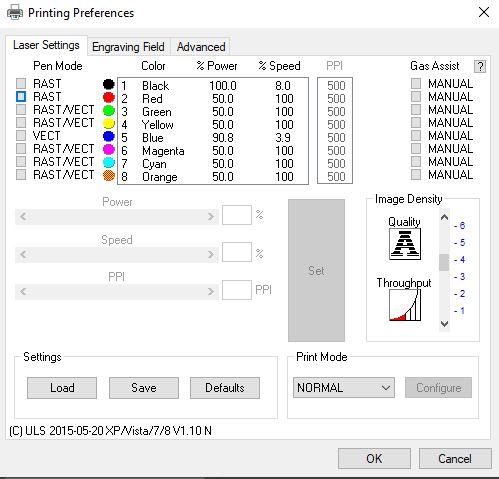
Send job, press START. If you immediately hear TWO BEEPS, your job is EMPTY. Either the Orientation is wrong and it shifted all the content off the workspace, or you have VECTOR selected but the LINE WIDTH inside Illustrator, etc WAS NOT SET TO 0.001" WIDTH

If RED LIGHT is FLASHING, CHILLER IS OFF or LID IS OPEN

The beam flashes with an intense flicker when it hits the honeycomb. Don’t freak out this seems normal

To power off: Peal’s power switch, the chiller, the exhaust blower. In any order.

EDIT: I WROTE THE Z BACKWARDS, IT NEEDS TO BE POSITIVE

4 Likes

Awesome. Thank you for the write up Danny.

Thank you Danny :pray:

Thank you @dannym and @EricP! Pearl is in Skedda now (between Shark CNC and Blue Laser).


I referenced this post in the info for the space (popup when you click the (i) next to the name).

@dannym let me know if it gets to a point where I should totally grey out the slots for blue and red (that way we don’t have to make reservations for them being down).

1 Like

Please Note: I wrote the Z directions backwards, I have corrected it above.

If you have 0.25" material, if you were starting at Z=0, you’d press the down arrow, and the display will show a POSITIVE coordinate for Z. You need Z=0.20", positive, not negative

1 Like

Lightburn, being the magnificence most could only aspire towards, just sent a proposed fixed version for the vectors going to ULS so we can just handle everything in LB.

I will test tomorrow.

1 Like

I think the z axis got messed up somehow. I am struggling to get tight lines. I will probably just head across the river and use the laser down there since I don’t want to mess with this machine too much. I set it to a negative number like in the photo and then I switched it to a positive number like in the post below that photo and it is still off. It is making wide lines so the laser is too far away. I am just posting so maybe someone can come fix it or at least let the next person know they might need a little more time to make it work.

1 Like