Thought I’d share this (new to me) technique that really seems too good to be true. I believe this was the originator of the process:

This video is very good too and shows using Lightburn for the technique:

Thought I’d share this (new to me) technique that really seems too good to be true. I believe this was the originator of the process:
This video is very good too and shows using Lightburn for the technique:
Hi Branislav, I’ve got all the materials to do this (veneer, aluminum, etc.) and have a detailed image to do. I’d be interested in joining up with you to make some of these. Are you interested? Bri
Make sure you use Tarkin for this process. I tried and failed miserably at this. I hope y’all try this and have the success I couldn’t get.
I know you didn’t ask me, but I’d like to be in the room if/when you try this technique, your projects are consistently impressive!
The level of detail I’m seeing is beyond what I thought possible with wood veneer and lasers, but the step shown at the 3:43 mark in the video looks like it would be a PITA to do on Tarkin.
I actually don’t get why he does that part, if he explained then I missed it.
James the technique in the video is much different than what you tried. The foil keeps the pieces aligned and sorta maleable. They also use more glue than you did. I have done this before but used the veneer glue which has a longer open time to set (around 15 mins.) So you can arrange or move the pieces as necessary. Im not sure how old is the video but the technique has been around for a while just different ways to do it. This is stuff that is kept as a pro or trade secret. There are all kinds of things you can do to have the contrast, you can take good old wood putty fill in the recessed area wait to dry, sand flat and ta-da! Take the same wood putty add a few drops of acrylic paint follow the same process. You can mask the piece and once is finished lasering spray with clear laquer first, wait until it dries then spay any color you like. Remove mask. If you spray the color paint first the char or sut will come through the paint. Chrome or gold paint sometimes looks rather well. You can fill it with 5 min. epoxy. You can color the 5 min. epoxy. You can use resin. You can use acrylic. You can use copier toner, spread the powder try to clean as much as possible from the high area, spray with laquer (it sets the toner) then sand until the high area is clean. It works with any of the colors. All of it sounds complicated but is not and probably not available in Youtube. But when it is, it maybe the greatest thing since canned corn in TX!
Is an alignment thing. If you use the “center out” origin feature on both pieces as in finding and marking the center of the piece, you should not need this process. Or cut one square which is going to be the inverted image. Then raster/vector the initial image in a bigger piece. Secure the piece so it doesnt move, remove the piece and insert the other piece run second image
It should be aligned.
that step is just about getting the work flat. if it’s not flat, then parts of it could be poorly focused. they’re using the same standard 2" lens we have on Tarkin and it’s not extremely sensitive to being a few mm from perfect focus
it may well get flat enough with normal methods. you could also use double sided tape or temporary fixture adhesive to stick it flat against acrylic, mdf, etc
and yes you definitely want yo use Tarkin for this. or Pearl. Dorian’s hvdc excited tube is much slower to turn on and off so it won’t yield sharp vertical edges that line up. plus its raster speed is much slower to begin with.
the key shortcoming in this video is it’s for Trotec and doesn’t get into the way Lightburn and Ruida would handle it.
it’s going to need to be set to b&w graphics mode. past that, there may be some nuances about where the threshold and first line alignment is between the positive and negative images, but actually I don’t think there’s any issue there if it works the way I expect
it looks like you’d want to get plain veneer with no adhesive backing, but you might also be able to use adhesive backed veneer with regular non-adhesive tin foil too.
some veneer products have a flexible plastic mesh on the backside. I don’t think that type would work so well with this process.
i have adhesive back foil tape but it’s all only 2" wide. that’s fine for small pieces- well, actually it can be pretty long, just limited to 2" width. I am not sure how well this would work if we try to overlap multiple strips of 2" tape to make something wider.
the video shows a wider adhesive backed foil. i see 12" wide by 55 yard roll on Amazon but it’s $49. and it looks like it may need a proper spool and/or case to keep it from getting creased or bent up. this stuff has a paper backing on it like my 2" tape has, and it really tends to unspool itself off the roll and get crinkled up during storage and transport
i don’t see any reason this technique wouldn’t work well with mother of pearl inlays too
I have this specific roll, so no need to buy it. Contact me if you want some
I also have some plain veneer with no adhesive backing. And the roller to apply aluminum tape to the veneer smoothly. In other words, I’m ready to go, just need to get started.
@Branislav, contact me to set up a time when we can try this together.
I see a pretty good looking variety pack of unbacked veneers on Amazon for $37 with a week shipping until arrival, but the details show Woodcraft is the vendor and they have the same pack in stock in town for immediate pickup for $25. That Woodcraft is not far from Asmbly and is on the way for members coming up I35
also, it would be possible to build a vacuum fixture for Tarkin. The regular magnetic clamps would fix it to the bed, you cover the unused surface, and attach a hose to a push connect fitting on the side of the bed leading to a small vac pump in back, and there would be a separate switch to turn the pump on.
Such a fixture probably wouldn’t be as universally useful as it may seem. The stock would have to be thin enough that the vac van flatten it out. But most of the jobs working on thin stock cut all the way through. This would mean the vac pump would take in contaminants which could damage it, the cuts would allow air in and at least partially spoil the vac, and the laser could damage the vac bed surface.
The foil-backed veneer is a unique special case where none of these issues apply. There is an opportunity. But users would need to know to only use it for this. Also sizing such a fixture is difficult since the common veneer pieces are often 5"x8" but could be much larger.
Long ago I experimented with a vacuum hold down concept for the lasers. In the first step, I put down just a thick piece of flat aluminum over the honeycomb and put some plywood stock over that. No vac at that point. But without honeycomb underneath, a surprising amount of wet gunk condensed underneath. I expected some soot, but apparently a significant amount of water vapor is in the exhaust gas. The condensed gunk made a mess of the stock’s bottom surface and the fixture plate.
Also, any extra power left after cutting through reflected and burned the bottom of the work. So, when doing general cuts, a metal plate drilled with vac holes seems to be off the table. I wouldn’t rule out a smaller honeycomb piece with sealed sides and bottom and a vac port.
But that didn’t address the size question. Many people need a vac fixture because they have thin, warped wood across the ENTIRE bed that cannot be clamped in the middle.
Actually, Tarkin’s bed which hold the honeycomb is a tray, mostly sealed on the sides. With an exhaust fan capable of higher static pressures, simply covering the exposed parts of the bed could create the static pressure difference that would suck wood flat onto the bed.
That wouldn’t be possible with Dorian as there’s not any sort of enclosed tray holding they honeycomb.
The main issue would be an exhaust system capable of either high volumetric flow for normal cases but also high static if covered, as well as being tolerant of contamination from the exhaust smoke and gas. That’s quite difficult. And the exhaust tubing might have issues with pulling inward on itself under vacuum.
I think I’m going to think about this. The mag clamps are extremely useful most of the time, but can only grab from the edges so they don’t flatten the middle. Those weights people use are probably the biggest cause of Tarkin’s downtime because the head striking the weight can knock it out of alignment, and they’re often not that effective at actually getting the wood all that flat.
Anyhow, most of that would only be a problem for cut-through work. This foil-backed veneer doesn’t put contaminants into the path to a vac pump, if actually restricted to this use. The question of how big a bac fixture should be is still problematic.
Overall I think foil backed veneers can be made flat enough by simpler means- counter-bend the middle down so edge holding flattens it to the middle. Or use double sided tape or temporary fixture adhesive to hold it on something flat and rigid like MDF and clamp that down.
as far as setting go
start with the highest resolution image you have. don’t use an external tool to threshold it into b&w. the image should be b&w overall, but the way that typically works is the edges are greyscaled so it doesn’t look like a jagged edge. Lightburn is going to do its own resampling via line interval and the threshold gets applied after that.
i would say do a small test square, image, black and white, at 400mm/s 100% power and adjust the line interval to adjust the burn depth. I would keep the line interval under 0.1mm. it should be fine to speed up the raster to up to 800mm/s, but the slower speed may get more vertical edges.
i would avoid setting power below 100%. this may ending up being a tradeoff somewhere because 400mm/s, 0.1mm line interval at 100% power might cut too deep.
this is a special case. i would say go into layer settings, “advanced” tab, check “pwm override” and use 40khz. this is a very short period and tube power output scale isn’t very linear in this region, but if we’re rastering at 100% power the controller won’t be doing any output scaling anyhow. the reason this might help is that pwm is actually what modulates the output as it crosses from a white pixel to a black one or vice versa. it won’t change the state of the fire command until a new pwm period starts. and that pwm timer is free running, not synched to anything, so it creates randomness in the edge location that won’t match exactly between positive and negative copies. But at 40khz 400mm/s that whole pwm cycle is only 0.01mm wide horizontally so the error ends up being insignificant.
if 400mm/s 0.1 line interval isn’t deep enough, scale to your goal by reducing line interval.
if it’s already too deep, maybe increase speed to as much as 800mm/s or increase line interval up to as high as 0.15mm. you can reduce power from 100% but at 40khz the response is not very linear- like if it’s 20% too deep, 80% power should have put it on the nose but nonlinearly means power might need to be 60% (or 90%, I’m not sure) to reduce final output by 20%.
use the depth gauge thingy on the calipers at the opposite end of the jaws to get a depth similar to the veneer thickness while cutting a small test rectangle. you want the veneer to press in and be as close to flush as you can. if you are going to error, error on the side of the substrate lumber being too deep. the substrate has plenty of thickness to spare, whereas if the veneer is too high then sanding it flat could take off too much of the veneer thickness
the substrate and veneer are inherently different woods so the ideal settings won’t be exactly the same. i would say get the substrate cut depth dialed in first. if that doesn’t work for the veneer, keep the line interval identical and only adjust speed if possible. speed can go as high as 1000mm/s max. only if that’s still cutting too much, then keep the same line interval and reduce power there.
Thank you Danny
Wow! I had no idea this would kick off such interest – glad to see I’m not the only one who’d like to give it a shot. Thank you for your suggestions @JOSEGAYTAN and @dannym – I’ll be sure to incorporate them into the testing.
@bwatt I’d be up for giving it a shot next weekend? I’ll need a bit of time to find a good test design and/or we can go with whatever you have in mind. And @DanHawn, we should be able to coordinate with you as well if you’re around ![]()
I was planning on going to the SIG on Sunday, I don’t know if Brian is planning to make it to that one, but maybe someone wants to book time on Tarkin after the SIG? Would be a great topic to talk about during the SIG too.
@DanHawn and @Branislav,
I’ll be at both SIGs. I’ll bring my Inlay stuff to the SIGs (Veneer wood, Base wood, Aluminum, Tools, etc.). Please bring your things too. The more the better.
I have signed up for 1:00-4:00 PM on Sunday December 1 after the CNC & Laser SIGs. @Branislav, I hope you can make it then? Please tell me if you can or cannot.
I don’t know how much we’ll be able to do, but we can meet, talk and give it a try with your help.
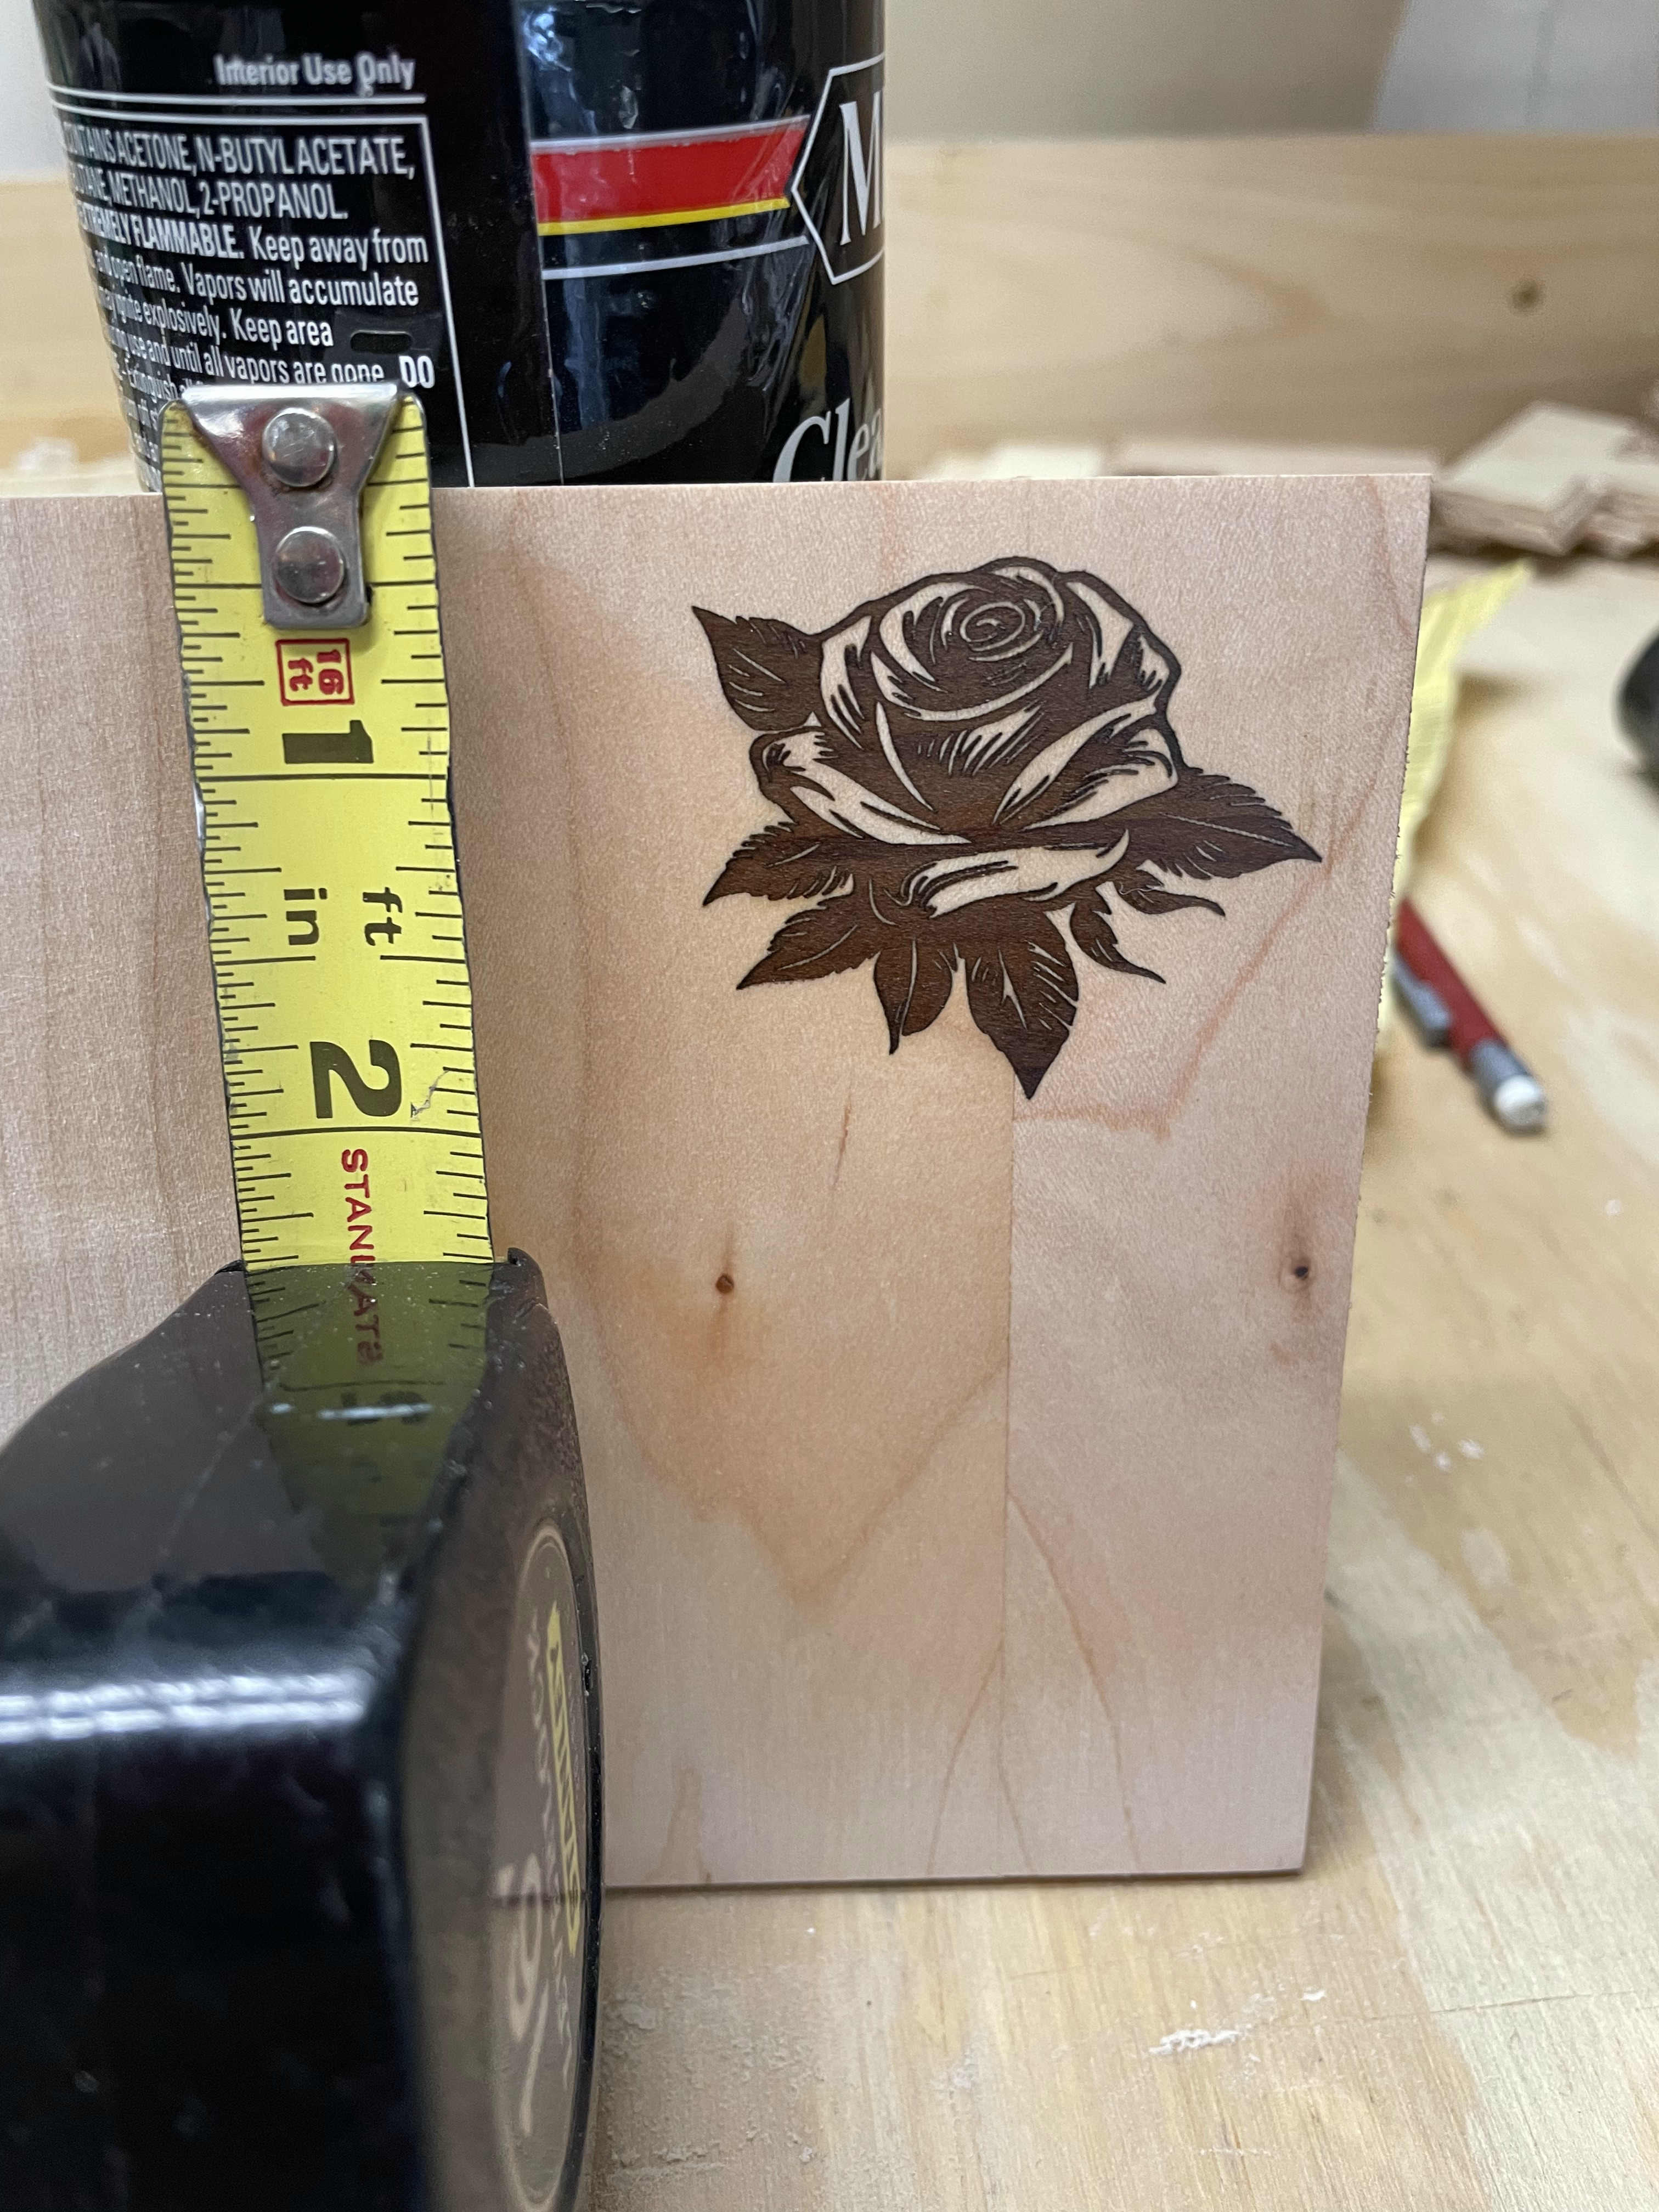
Below is the image I’m interested in inlaying. I have both a positive and negative of this image. We need to make sure we use a mirror image for one of them. I would use a light-colored wood for the base and a darker-colored wood for the inlay, much like the image. I have some maple base and walnut or padauk veneer.
Bri
P.S. Image courtesy of my daughter, Katie, who is a professional designer.
P.P.S. Change date info to the Sunday Dec 1st. That Skedda calendar messed me up.
Thank you for pulling us together, @bwatt! Yes, I can join you all for both the SIG and tests on Tarkin right after. That said, Michael’s post here says the SIGs are on Saturday?
Fixed my posting above - it’s Sunday Dec 1 after the SIGs. I think Michael fixed his too, because it now says Sunday Dec 1.
With the great help of @dannym (Danny Miller) and @Branislav (Branislav C.) and after numerous tries at different settings we were able to create an inlay using the technique introduced in the article at the top of this post on our Tarkin laser. We glued the two pieces together with Titebond III Ultimate Wood Glue Waterproof. When I got home and after it dried I sanded it and applied a light coat of lacquer.
The result is on maple and uses a veneer of walnut. The parameters for Tarkin for both female and male pieces are:
Offset: 0.015 applied to both in the same direction