Engraving acrylic on Tarkin -- any suggestions for starter settings?

I can leave some for you to try

1 Like

That’d be great! I probably won’t be able to swing by until Sunday afternoon but I’ll happily take whatever bits you don’t need. I don’t know if there’s somewhere you can leave them, so let me know if you think of a place. Thanks so much for the offer!

The Up For Grabs shelf with Branislav’s name on it would be the appropriate place to put it!

1 Like

@Branislav i just bought a 12x12 piece of 1/2” cast acrylic for this purpose, but won’t need that much. We can split it if you’d like.

1 Like

Thanks @valerie :smiley:

That’s very kind @gordoa40, I’ll take you up on it! Drop me a PM once you know how much you have left over and what I can PayPal/Venmo/whatever for it :smiley:

1 Like

A short update for those interested:

I tested a number of power/line interval/speed settings. The bad news is that I don’t think I hit on a perfect set of conditions yet. The good news is that this definitely works but I think requires testing for each design, or at least for sets of designs that share similar line widths, areas, etc.

Since I only had one design, I ended up settling on 1/4" clear acrylic (no protective tape) and eventually landed on the engraving depth of about 1/8". This is what it looks like:

(the stamp is brownish due to the leather dye lifting off during the stamping)

I think I settled on about 500mm/s @ 100% power for this one. The edges are indeed sharp, but did not tear into the leather. The rough bottom of the engraving also did not transfer into the leather:

Overall conclusions that I’ll follow if/when I do this next time:

  1. Test your design + material combinations as it’s not clear to me there’s a single best solution
  2. Make sure you case the leather really well with warm (but not boiling) water
  3. Be aware that superfine details may not transfer into leather as well as you’d like, and it most likely depends on the leather temper as well as the pressure applied

And in case you’re curious what this is about: it’s a “coin pouch” keychain for a secret Santa exchange. My recipient is a fan of Manchester United so I got him a poker chip with their design, made this pouch (based on a design I saw on r/leathercraft), and stamped it with their devil logo (svg from Wikipedia):

3 Likes

What line interval did you go with here?
The banding lines are due to the gaussian beam distribution- it is strongest at the center of the beam and cuts deeper there, unlike a CNC endmill. Closer to a taper mill.

Smooth bottom surfaces come from small line intervals. I would say less than 0.1mm. I have done 3D depth carving which definitely needs line intervals below 0.1mm and every time I send a job Lightburn nags me with a warning that most machines don’t have a beam that small and it might not go well. There’s no “I know what I’m doing” button to turn off that notification.

Note when you halve the line interval, you double the number of raster line passes so it will cut twice as deep. You can kick that up to 1000mm/s to make its depth equivalent.

The best impressions I get are from wetting with cold water for a decent soak, let it dry halfway, and tool at that point. The leather should be like clay. Heat is not good unless you want to harden the leather.
Also very important to have a very dense surface like granite to stamp the leather on, especially if you’re using a mallet.

Like I say, you may need to round off the edges by the method I gave to avoid cutting the leather.

I varied the line interval quite a bit, from 0.05mm to about 0.09-ish mm. It always produced a rough bottom surface, as you can see here:

(I had a few more that were too shallow so I tossed them, but what is shown there is typical)

I didn’t get any warnings when I went with very dense lines though, which makes me wonder whether Lightburn truly accepted my inputs or just ignored them.

I think pearl would give you much better results for this design. That has always been my experience with Tarkin for rastering

3 Likes

Gotcha – thanks for the suggestion @EricP. Looks like I’ll first need to get certified on the small lasers in order to use Pearl, but I’ll keep that in mind for the next one.

@valerie might be able to chime in on the differences in rastering between the small laser and large ones.

What mode are you using?
And that’s not the final graphic you’re putting in, right? It must be black and white, not red

This was the actual design sent to the laser (well, reversed on the X):

I had two layers: the red was a fill (where I varied speed, power, line, etc.) and there is also a black cut line around the edge (100% power, speed varied only to make sure it fully cut the acrylic). That was my understanding of how to separate engrave vs. cut. Was I supposed to do something different?

I would use an Image mode rather than Fill.

Image mode would require a black and white image.

I would recommend Grayscale mode, and this means the background needs to be 0xff black, rather than converting the red image to grayscale which would probably yield a 0x55 shade.

If instead you use Threshold mode, then red should still be OK. But there’s no option forward with variable depth in this mode. Variable depth may be need to slope the edges of the stamp features to avoid cutting the leather.

I did some test runs last night, here’s what I found:

  1. Image mode worked well for me, I did not try anything else, but it rastered well every time.
  2. Here were my settings – I tried one on 50% 500mm/s and one on 35% 500 mm/s and I think the 35% one turned out better – some of the smaller details were warped on the higher powered one, and it didn’t need to be as deep as it cut. The left is 50% and the right is 35%.

  3. Don’t forget to mirror the image haha, I forgot on one of mine but still worked as a tester
  4. My stamps were about 1" in diameter, and for that size, the vise on the worktable in the woodshop provided pretty much the perfect pressure, for me. I would place it in there, and crank down on it as much as I could muster, and it would provide a pretty decent deboss. I also tried the pneumatic press in the metal shop, and while that did work, the results were inconsistent and because the presser-foot thing is not parallel, it would press at an angle and get a deeper impression on one side than the other (see the stamp on the top left of the image in the vise – that one was done with the pneumatic press). Also one time I pressed with waaaay too much force accidentally (the valve on that thing sticks, FYI), and damaged the leather and the stamp (see the fifth stamp up on the second row, in the image below)

  1. Here were my results from my experiment when I was at the shop, and then a day later when the leather had mostly dried. Some of the ones on the bottom were done on the press, but most of them were done on the vise just playing around with pressure and placement. I used two stamps for these, so they lasted for at least like 10 presses each. They probably could have gone much longer, if they didn’t have as much detail like the really thin line around the perimeter or the small “Made in Texas” text, those were the first to go on all of them.


  1. I found that for the purposes of this stamp, I didn’t need to both with the Gaussian blur thing for sloping the edges, none of the stamps damaged my leather besides the pneumatic press one where I applied probably way too much force. I did try to create one with that method, but I think I blurred a bit too much and it turned out bad.
2 Likes

Here’s a closer up image of the 50%, 500mm/s, .05 mm line interval stamp. You can see how the “Made in Texas” letters were damaged/warped. I think they were just too thin for the laser/acrylic to handle in this application.

3 Likes

I would say 100% power 1000mm/s and try 0.025mm LI. That should yield 2.25mm depth.

With that small of an LI, the bottom will be very smooth. At 0.1mmLI, it won’t be that smooth, but 0.05mmLI should still be smooth.

So, leave at 100% 1000mm/s and adjust depth with LI

1 Like

@gordoa40: that is really useful information, thank you very much for plowing through all the different settings and conditions.

I don’t know what my next stamping project will be, but it sounds like at least a few of us could use a power/speed/interval matrix in acrylic. Most of the ones I’ve seen out there are greyscale squares so I’m thinking something that incorporates lines and text would be useful. Here’s a (really low-effort) PowerPoint mockup of the test design:

image

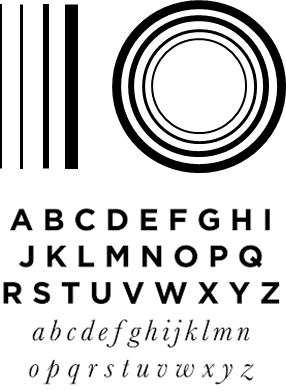
And/or include varying letter sizes. Then engrave a bunch of these designs in a matrix varying power/speed, labeling each setting in the design. We could deboss a few pieces of scrap leather with all the resulting stamps and mount both the matrix and the leather somewhere visible to everyone.

The things that would be hard to control for from one application to another are on the leather side: the temper, casing process, pressure applied… I think it could still be a decent starting point.

I’m happy to collaborate with anyone interested in creating a shared test design. I don’t have any particularly strong feelings about what it should look like other than making sure we vary the line thickness and include alphanumerics.

(I apologize for dropping out of the discussion for the last 10 days or so, it’s been an unpleasant time)

2 Likes

This type of testing and sample making sounds like a great idea. Having a starting point to work from is so helpful