Would it be possible to pocket the table, and develop a jigr to hold boards for cutting joinery on the ends? In an earlier discussion on this topic, @Mollie mentioned that you could put a jig on the far end. Will the gantry go past the far edge? By how much?
I was wrong. I checked it the other day and the gantry does not go past the current spoilboard. We’d have to cut in a pocket for a jig.
I can’t refrain from tossing these in:
Great joinery software: JointCAM - CNC Dovetails and Box Joints

Here’s how the fanciest of the joints was formed:
3 Likes
Could the front be modified to have a section pull out, stopping at a cross rail?
I think it is possible to move the 1st rail back a bit
Should we tinker with the big CNC for this or ensure it can be done on the Shark?
I don’t think it can easily be done on the Shark.
I wonder if we could make a section of the spoilboard toward the back removable so that the back rail could be used to clamp vertical stock and then the spoilboard reinstalled after that particular job is done?
2 Likes
Is there a way we could create a a jig the bolts in to the back of the table? Something the wouldn’t interfere with surfacing the spoil board in the future.
I like it. We could easily do that.
-I assume we need to use the cnc to shorten the bed in one section.
-Add a brace and jig plate
-figure out the offset for it
-setup training and workflow
1 Like
We need to buy a fixture plate.
There is a fixture plate on the way. Should be here early July
2 Likes
I realized this morning the last support for the spoil board is already there. We just need to shift it to accommodate the fix plate and generous cut are for jointery.
I have the rails are sized for 8 ft travel, plus a small margin. The bed extends a little past where the center of the spindle can go. The bed occupies all the available travel space.
Shortening the bed along the X is not a good option. It makes some sense on the far Y+ but it creates new problems. Temporarily removing a section would likely create leveling problems when it’s replaced, and it does look like it can really complicate adding to the spoilboard to maintain it.
Could you clarify what “we just need to shift it to accommodate the fix plate” is about here? I can’t picture anything that could just by shifted.
Please let me know what you’re picturing. This would be a significant mod to the configuration.
I wouldn’t change anything without asking 1st. I haven’t used the router in a bit. I will look this week to see what is possible.
I think the only way we could make it work is to have a thin rectangle cut into the spoilboard toward the back that would give access to a vertical clamping jig underneath. When we add new MDF to the spoilboard we would have a program that cuts out the holes already in the spoilboard that give access to the rail bolts joe installed a while back, and cut out the pocket for the vertical jig. I think 2 ft by 4 inches would be enough space for most vertical projects and small enough that it wouldn’t interfere with someone laying down a 4x8 plywood sheet or keeping the spoilboard level.
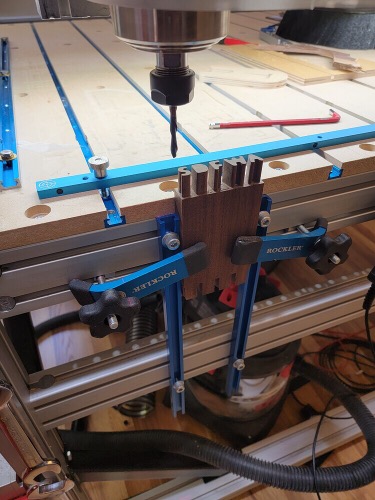
I have a file with the locations of the holes that joe cut in, so that I can use them for jig positioning. This picture includes a slot cut into the spoilboard for vertical stock. The first thing we’d have to figure out is what the vertical clamping jig would actually look like and how we would attach it to the rail system safely without compromising any structure. That would determine where the access hole is cut in the spoilboard.

This way we wouldn’t have to change any structure on the CNC itself and it would have minimal impact on the spoilbard.
2 Likes
Nice work. The fixture plate is 4 x 10". Like you mentioned in the post. We would install it well below the spoil board. I think we need to add a vertical piece to the fixture plate so you can index your work. I also need to find a clamping system for the fixture plate
Holes cut through the spoil bring a significant problem- in normal use, dust frequently gets dumped on the floor and it can be underneath where people can’t easily reach and don’t see it.
First thought is putting a thin cover board underneath it, but then it’s something you have to crawl under the machine to take on and off, and the hole will still collect a big mass of dust and debris in normal use. We could make a full-thickness plug out of MDF for the hole, but it does need a way to attach. If it’s not attached, or just a hole, then when people put a nail or screw there for a holddown point, it’s not going to work. This may be difficult to see if the area is covered up by the stock.
We can move the last support in a certain distance and reattached the mdf to it. We use the cnc to cut the slot so the fixture plate can be attached and useable.
The fixture plate says it was delivered. It is now time to make the plans concrete.
1 Like