Sander is out of commission until we can get the electronics working on it again
From your problem report, it sounds like one of its error modes is triggered. The sander doesn’t notify you of these failure modes at all; it just won’t do anything when they’re active.
The two triggers I know of are either no compressed air, or that the belt Is hitting the tracking sensor at either end. Both are quick fixes, though if the tracking problem keeps recurring it may indicate a deeper problem.
I can not see the report but if “electronics” as listed above, not bueno as they are brand specific and parts are nit exactly “available.” If is just belt tracking issues, is an easy fix but Jeff Mcadams normally wants to know. Some of the belts are looking very beat up, some should be replaced.
Details and specifics are always covered/discussed in more detail on slack for the stewards.
This was just a general post to let the larger membership know the sander is red tagged.
Want to learn more or participate in tool fixes? Become a steward and earn a free membership!
Ping @Sid for more details.
Nah, if i need the sander, ill fix it (if it doesn’t need parts that are not available). If nobody has messed the tunning knobs is not hard to fix. Really they should consider running that part as Shane did, keep it in the open. There are plenty of people that dont want to be stewards but able to fix machines, like me.
@Jeffmc - are you able to take a look at the sander and diagnose what is going on with it? I just looked at it again and it isn’t anything obvious
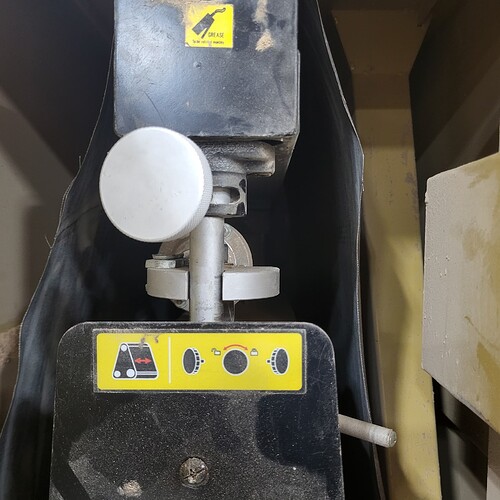
If tracking, this mechanism is the culprit. Loosen the knob adjust left or right (try very little movement to make it right) tighten and check. Below it, there is a black switch that releases the pressure on the rollers to reset the belt without turning the machine off. The edge of that belt does not look very healthy.
Yes - I’ll head up . What’s it doing ?
Jeff McAdams
Saw the thread . Will be there in an hour if traffic allows
Jeff McAdams
@Jeffmc - the sander is now magically working. I have no idea what someone did to it. Don’t come on just for that- it can hold until the next time you are in for a once over.
I’m lifting the red tag
@SteveW Hey Steve, it was not working well around 3:30, that’s why I came to this forum. I assume you lifted the red tag before 3:30. Two were using it after i arrived, then I used it. It seemed to “drop” as it sanded a divot into my board. Can you confirm when you lifted the red tag? It may need a lookin at. Or, has anyone used it after 4pm w no problems? Thanks
I wrote the post lifting the tag while standing next to the machine. I went back after reading your post at 9 pm and the machine is working properly.
Could you share more details about what happened with your project, in particular the length of your board?
Jeff sent me the below message directly. I’m posting it here with his permission:
—-
I looked at the sander this afternoon and noticed 1 minor issue and one major.
I won’t say they have 100% been caused by users - but it’s close to 99%.
I’m going to jump in and cover at a high level but will happily walk you and anyone through this at the machine but i’m pressed for time today.
-The primary issue that folks were having issues with was the tracking. The tracking relies on air and the air needs to be at a specific PSI - to low and it won’t run - a little low and tracking can be impacted. I turned up the air and it seemed to be tracking better.
- The issue mentioned by Kathy in the thread above could be from any number of things - but it can be avoided by pushing the piece through. I’m confidant the machine didn’t “drop” what most likely happened is the piece stalled on the conveyor and the user let it stall . When that happens the sander stays in one spot and will absolutely sand a divot out .
- the calibration is off by aprox 120. Example : when you measure the thickness of your board with the machine and it comes to .125 on the readout you need to adjust the number out to .240 for the proper sanding height. If not the sander is going to take way to much off .
That doesn’t happen on its own - I’d bet someone that isn’t familiar with the machine started playing with settings when it wasn’t tracking.
I know Jose and Freeman know how the machine operates and what to do in situations and there may be some others - but most do not - and some aren’t following what’s covered in the sanding class.
I’m going to see if I can calibrate quickly as I’m late for a meet . If I can’t i’ll put a sign on the sander .
Austin and I looked at a bunch of sander issues tonight. Jeff was right about the sensor height adjustment on the wide belt sander being ridiculously off. It was trying to take off almost 0.100" on the initial pass, so of course bad things happened. It wasn’t like that when I last taught the Sanders class on the 12th.
I had encountered something similar (though not this extreme!) a number of months ago, and I’d adjusted it then by inserting washers as shims until the first pass was just a bit lighter than a standard pass of 0.005". Upon reading the owner’s manual (if you can imagine that!), I realized that wasn’t the standard way to adjust that. So I removed my prior modification and adjusted the pedestal sensor until it was about right. I actually think adjusting it with shims might give you better control. But it’s now in the ballpark – the initial pass after setting the height using the piece thickness is very light, barely touching. We may want to refine that a bit, but it should now be safe to use.
Looking at the design of the adjustment, I think someone could accidentally have forced the pedestal platform lower, though it would have take a lot of force, because the bolts holding it were tight. (It wasn’t a settings issue; the displayed values don’t affect the height stop point.)
Austin also adjusted the tracking height of the edge sander, and I’m going to make a modification to the miter stop that will allow you to use the full width of the sander. We also think we may have discovered the issue people were having on the spindle sander that made them think so much force was required to remove a spindle.
TLDR: It should be fine now. The first pass may barely make contact right now. We might tweak that later.
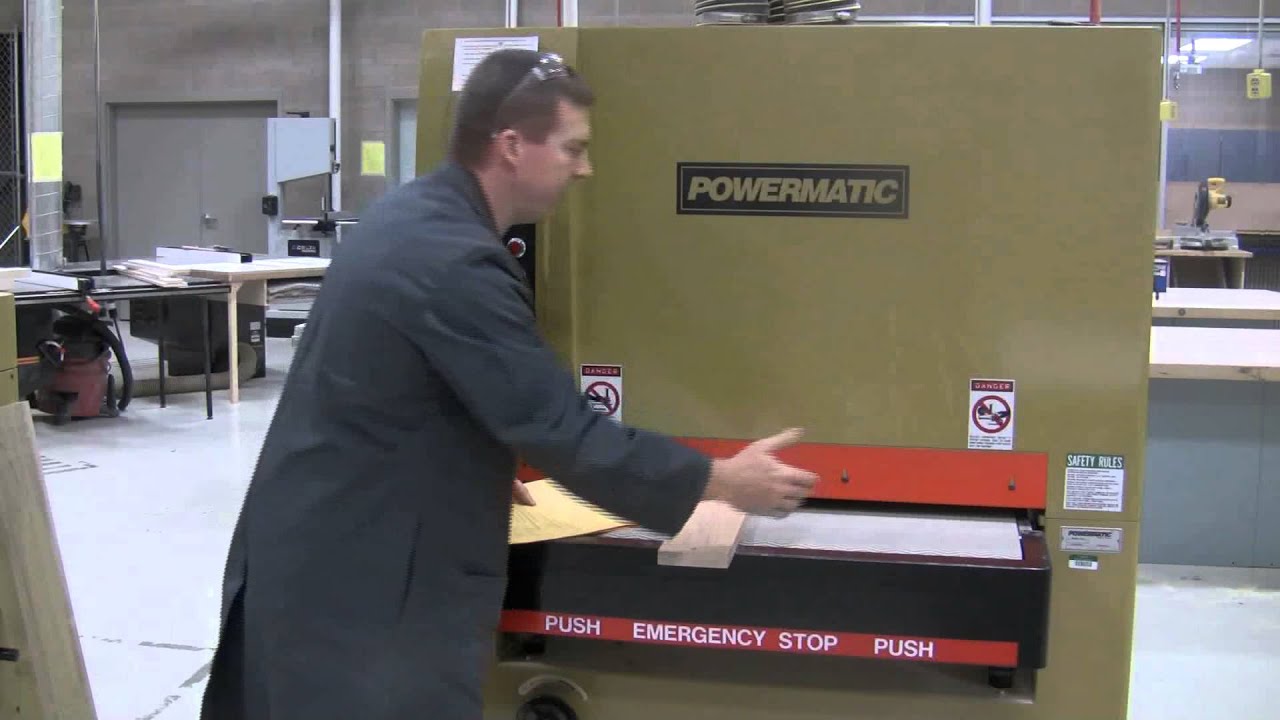
Jeff, if you have a chance, i think the front pressure roller is a little high, so it is not fully helping to feed the stock through. Suspicion is based on that once the stock is engaged by the outfeed roller, the stock goes through as it should. In other words, the operator needs to push the stock until it gets engaged by the outfeed roller. I agree with you that often people dont really know the full proper operation of the machine and with time causes the malfunctions that are being experienced. The most common one is tapping the up arrow more than once. Also as mentioned the initial pass taking too much due to the incorrect reading. For the most part the machine can handle it so people keep doing it. The part they don’t realize is that when you take too much stock, the dust collection partially fails and instead of the dust being evacuated fully to the dust collector, some remains inside the compartment and with time starts coating the moving parts and air orifices until they get sticky and start malfunctioning. The first of which is the tracking then the blocking of air orifices which would tear belts and last a fatal malfunction (broken parts). Another “bad” when the machine is overloaded, it overheats the belt which breaks down the abrasive and in turn overheats rollers and other parts inside which hastens the build up of dust and gunk of moving parts. The machine itself is a work horse, during normal operation, it doesnt break down often. Most of the down time is caused by operators either by abuse or overloading the machine. A lot can be prevented by the initial set up once the pressure switch stops, tap down until your stock goes through with slight resistance. You will never get a surprise of “taking too much” this way. Once you have that, run stock through one tap at a time. Learn to look at the square white gauge in the upper left corner. If it reaches 35, stop the machine as quick as possible. Use the manual wheel below the table to release your stock off the rollers. This video explains safety, operation, and some techniques. It is the best video i have seen for this sander. I surely can not explain all is covered in the twelve minutes he takes
duck://player/KNd0O6HkqEk
I understand if you take out the link but in my opinion something like this should be part of the class.
Lastly, i have not done it in the last few months but the machine does need to be greased and does need to be cleaned inside.
I’ve been putting together a handout for the class; I’ll take a look at the video link and most likely include that in the handout.

