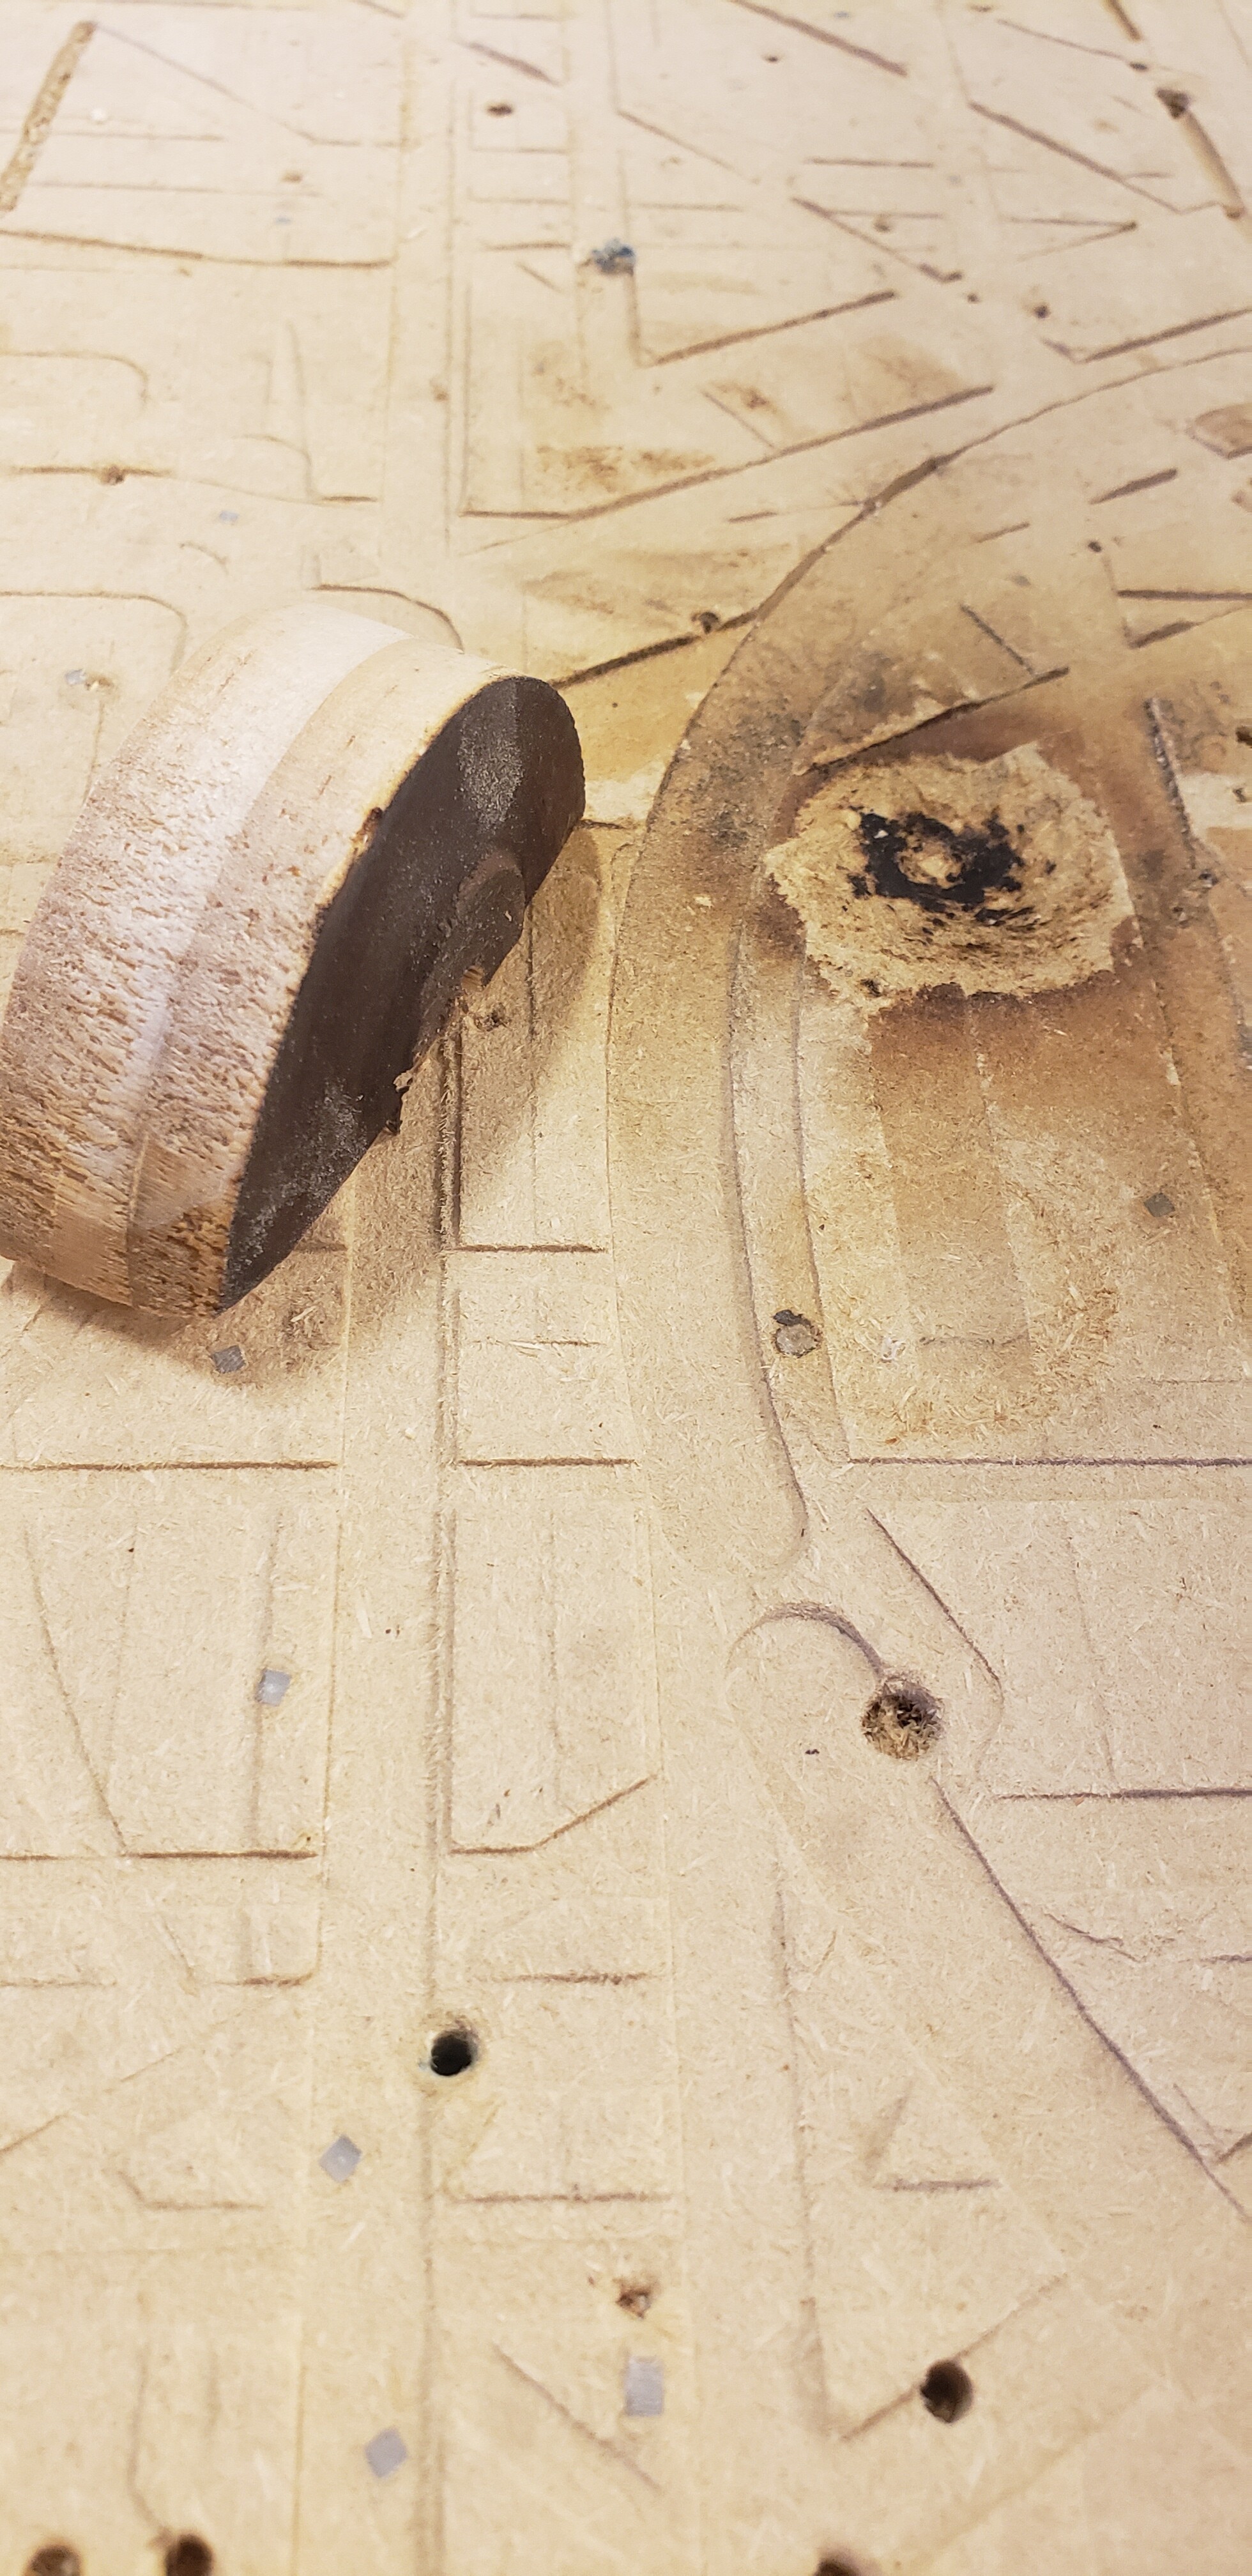
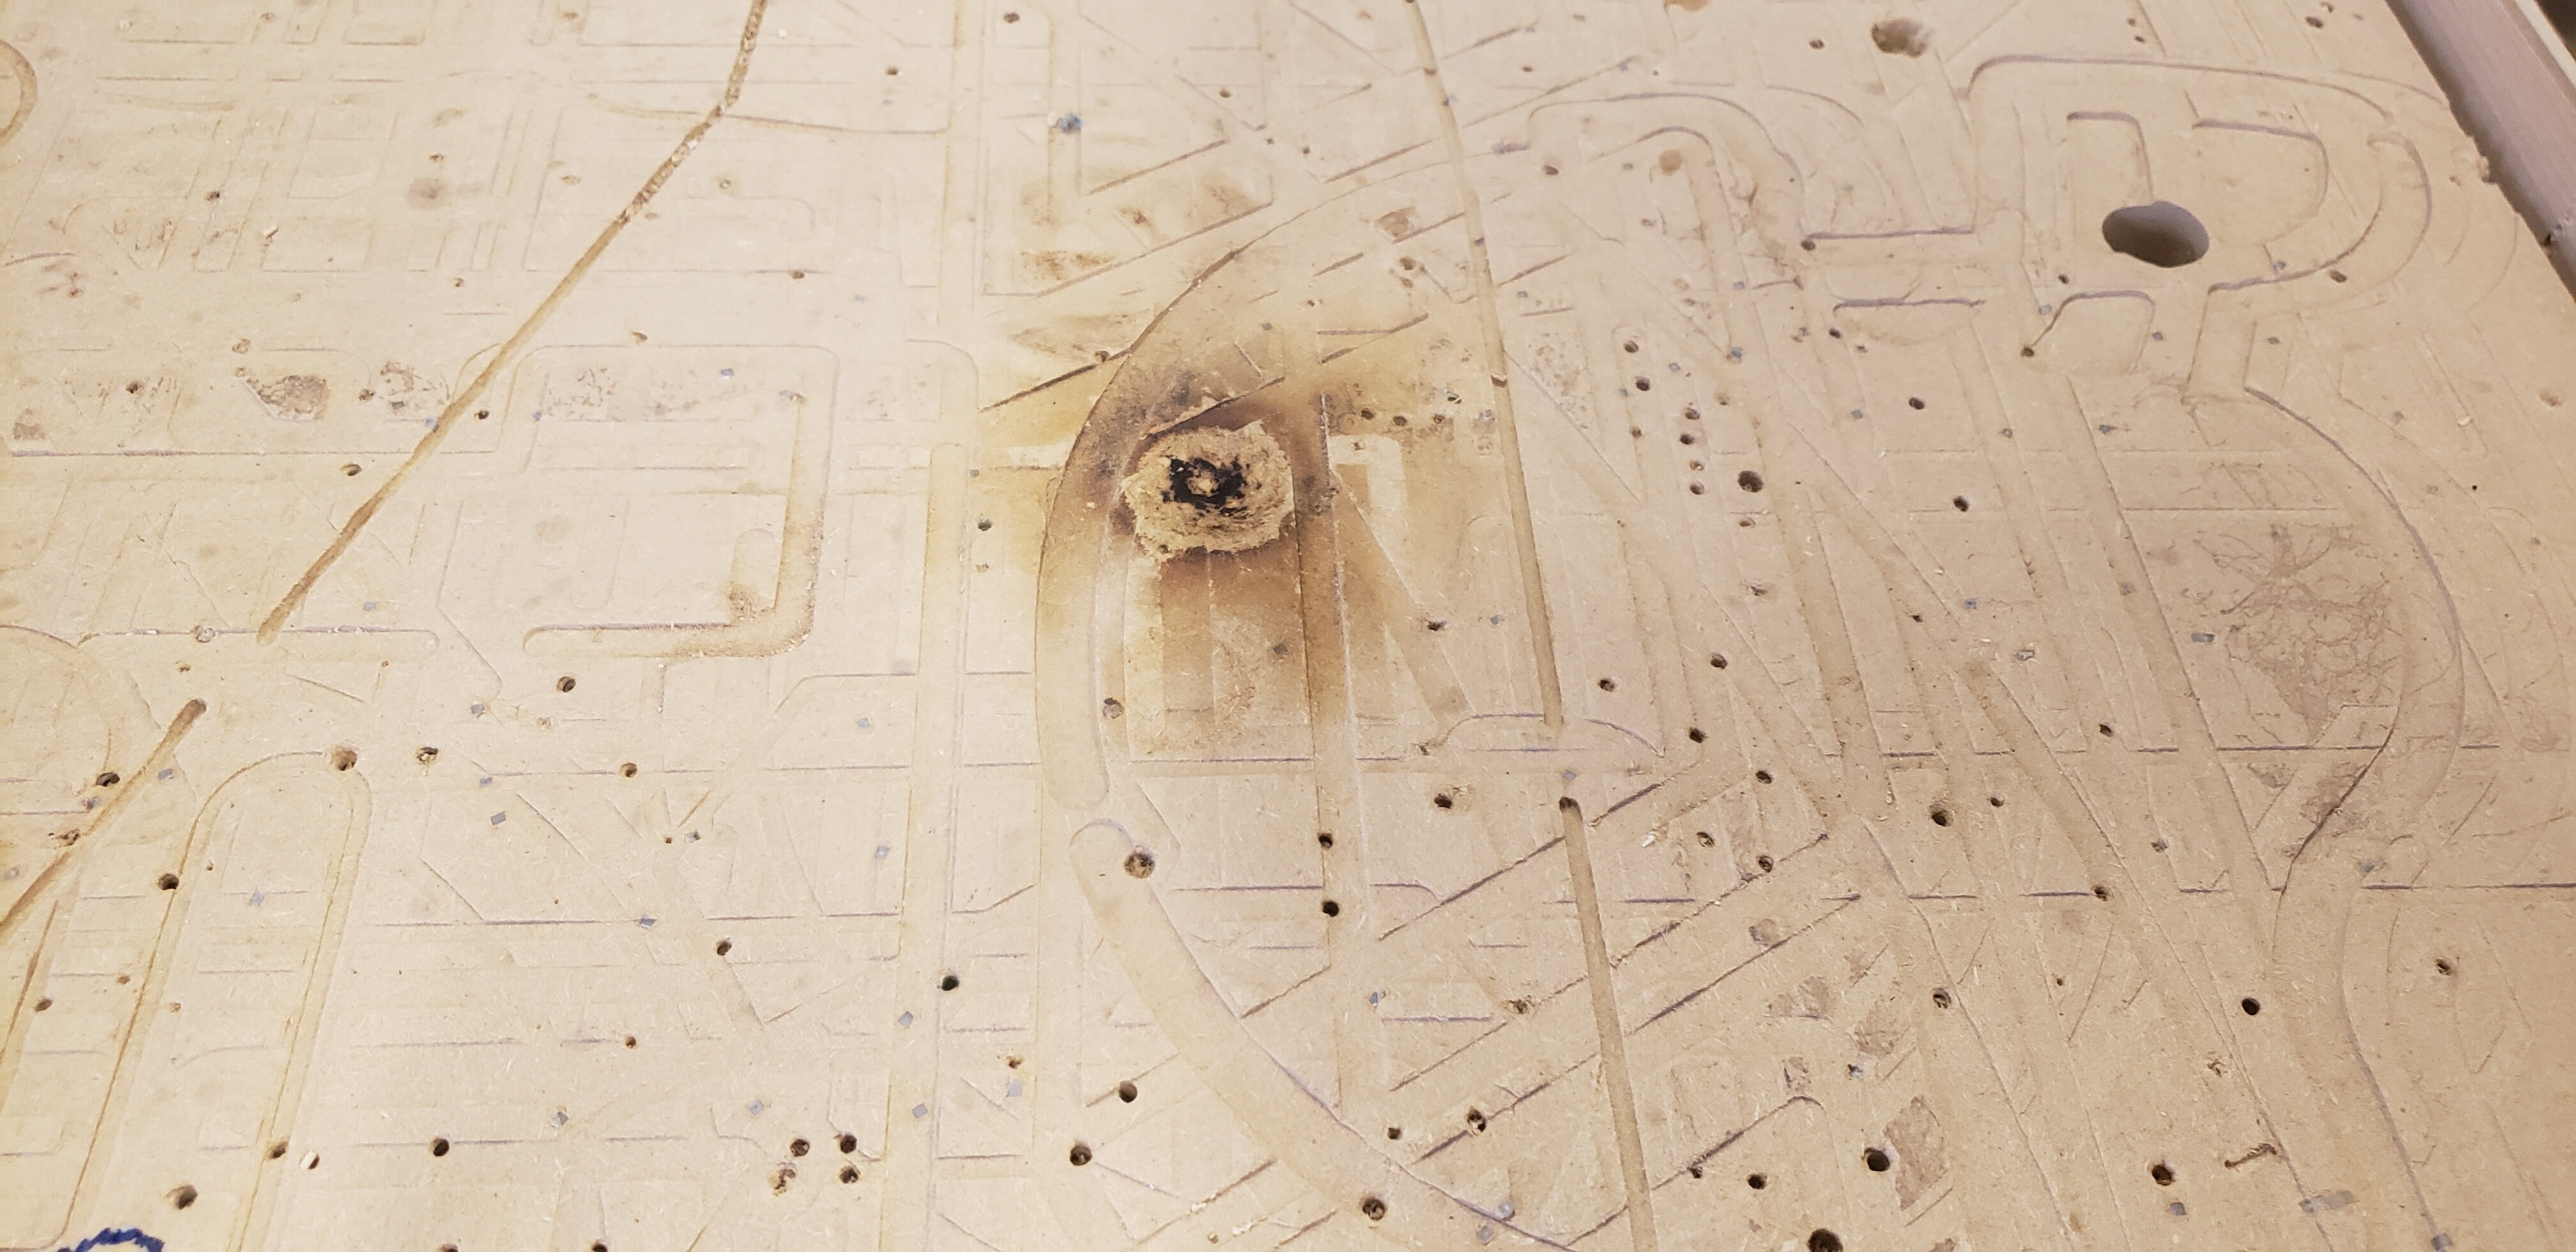
I’m writing to inform that this morning while running a program a slug from an inner cutout from one of my parts got caught on the end mill and caused a burn on the spoil board. I stopped the program, removed my board (now scrap), check the movement of each axis, rehomed the machine and ran another program (different, very simple part). This other program ran completely okay and was dimensionally accurate. I’ve included detail below on the issue, cause and correction. If anyone has any other suggestions I’d love to hear them.
Issue: Circular slug from inside cutout on 3/4" pine caught on end mill causing error.
Cause: Inner slug tab was too thin (.25" x .125") and it broke away from the board.
Correction: Increase tab thickness back to .25" and remove inner cutout post CNC processing.
I’m not sure specifically how the slug was caught. It may have been flipped or caught another way. The dust collection guard prevented me from really seeing the movement of the slug but it was stopped after hearing an uncharacteristic loud noise.
I did not circle this with pen however if I should’ve please let me know. I will be back in the space tomorrow and can do that then. Pictures are attached showing the occurrence.
Thanks so much for documenting and communicating this! It’s always good to get the info out there so people know and hopefully your lessons shared here help others from experiencing the same thing.
Agree with Valerie, thanks for documenting and posting this.
Also a good reminder of a bit of wisdom I learned in my first CNC class: listen to the machine. Weird sounds are sometimes (often?) your first clue that something has gone wrong.
If it’s a small diameter cutter relative to the cutout’s size, then it may take an excessive amount of time to obliterate as a pocket.
I’d suggest a compression bit might be best. In most cases, the chips don’t lift out and instead compact in the cut, which sounds bad but actually quite helpful as it holds most any size or shape piece in place better than tabs and it will not kick out. You might need a flatblade screwdriver to pry out the cut features from the dust pack afterwards.
I tired the pocket method this morning. Yes, it was very slow comparatively, however I’ll take the added time so I don’t have to clean up tabs/slugs on the inside.
Thanks again for the suggestion @dannym something so obvious just wasn’t coming to my brain.
Fwiw, I use a compression bit for the circles that I cut out. I leave dust collection off with no boot and the compression bit packs enough saw dust into the cut path that the cut out circle doesn’t move at the end and I don’t need tabs. And I’m running it at something like a 375 feed rate too. Compression bits are awesome.
Just did some research on compression bits and I think that’s a great suggestion by you and @dannym. Seems like a faster run and cleaner cuts. Do you use the compression bit without tabs for the cutout profile too? I’m cutting 3/4" pine at about 1/4" passes.
Yep, I use compression without tabs for all of my through cuts. It works great and no tearout top or bottom. I’m using thinner passes that 1/4 inch, but hickory is much denser than pine, so you might be ok with 1/4 in passes. Try it and see!
To actually use a compression bit as a compression bit, when you take multiple passes the first cut must be PAST the transition point, so it applies the downcut flute to the top surface. If the first pass is shallower than that, applying an upcut flute to the top grain, if it’s going to tear out from an upcut then it will tear out.
That’s not going to break the bit or anything, but it partially defeats the benefit of the compression bit over an upcut in preventing top surface tearout, as it’s just an upcut bit below the transition. Later, it will still usually pack in dust to do the self-holding.
I would suggest at least the first pass be deeper. You did say pine, this is soft and the bit will have no problem going much deeper on this, or any pass.
Compression bits are designed to do a job in one pass through the full thickness of material. This avoids successive re-cutting of a channel already packed tightly with chips from the previous pass. You can take smaller steps, but this may not be the most effective way to use it.
Since a small-diameter shank might be overstressed by single-passing a much thicker piece of material, sometimes this mandates acquiring a larger diameter compression bit to be able to one-pass thicker stock. Trying to apply a compression bit that is rather small to a deep one-pass operation and just slowing down feedrate to reduce cutting stress can result in burning and excessive bit wear.
If you get your tools from Toolstoday.com one of the measurements it gives you is the depth of that transition point, so you’ll know exactly how deep your first pass needs to be for that particular bit.
I remember bidding on your project. I assume you are prototyping to start manufacturing. Get good quality bits. They last longer and perform better. Mollie mentioned Tools Today. They are a great resource