Cutting glass on the CNC

Is it possible to cut glass on the CNC? Say to make something like this:

Doing some research, it seems that this would require a diamond burr or glass drilling bit with lots of coolant. One user mentioned cutting it while the glass was submerged in water since our machines don’t supply coolant, but I wouldn’t think to try that without getting approval and supervision :grimacing:

Nothing that requires coolant of any sort is allowed on our Laguna cncs

1 Like

Yep, @stepho nailed it. That’s a hard no.

Mirrored acrylic can be cut on our lasers very effectively, though. Houston acrylics is a good supplier

I wonder what would happen if you had a traditional glass cutter (hardened steel wheel) on an assembly like a drag knife.

I also wonder how horrible glass dust would be for the Tormach…

1 Like

Luckily the Tormach doesn’t have enough stroke to justify trying it…

A scoring tool on a CNC won’t cut it. In theory a castering drag knife scoring tool would score it and glass nippers do the breaking on the score line, but I doubt this would work that well.

If you put glass in a CO2 laser and try a normal slow cut, once you get a speed that cuts it, it will instead just crack the glass in random directions

We actually have done some interesting tests cutting glass on Tarkin. This involved making many light, fast passes to create a deep score line, followed by a single slow thermal pass that creates a crack that will hopefully follow the score line. It does work in some scenarios, and it can create concave areas that would be very difficult to make by hand. However, the CO2 laser technique might fail and ends up breaking in random directions too

A basic difference is that glass does not “ablate” like acrylic or plywood. Acrylic in the cut zone turns to gas. The CO2 laser can’t vaporize glass, it creates cracks but removes very little glass, very little even becomes free dust.
Addinitional passes mostly land on the existing cracked bits and don’t cut deeper on successive passes

Under a microscope, it looked like sometimes successive passes just re-melted glass in the surface of the score zone over and over.

1 Like

But the simplest answer is just ask Binswanger, our local glass mfg. They’re probably who you’d get the glass from anyhow. They may be able to get it precut in from an svg/dxf file

2 Likes

Something like that is simple enough to do by hand, probably. Maybe CNC or print out a template to draw the shape on the mirror, and then just a regular handheld glass scorer and running pliers to break it off in chunks. May need a glass grinder to clean it up afterwards.

2 Likes

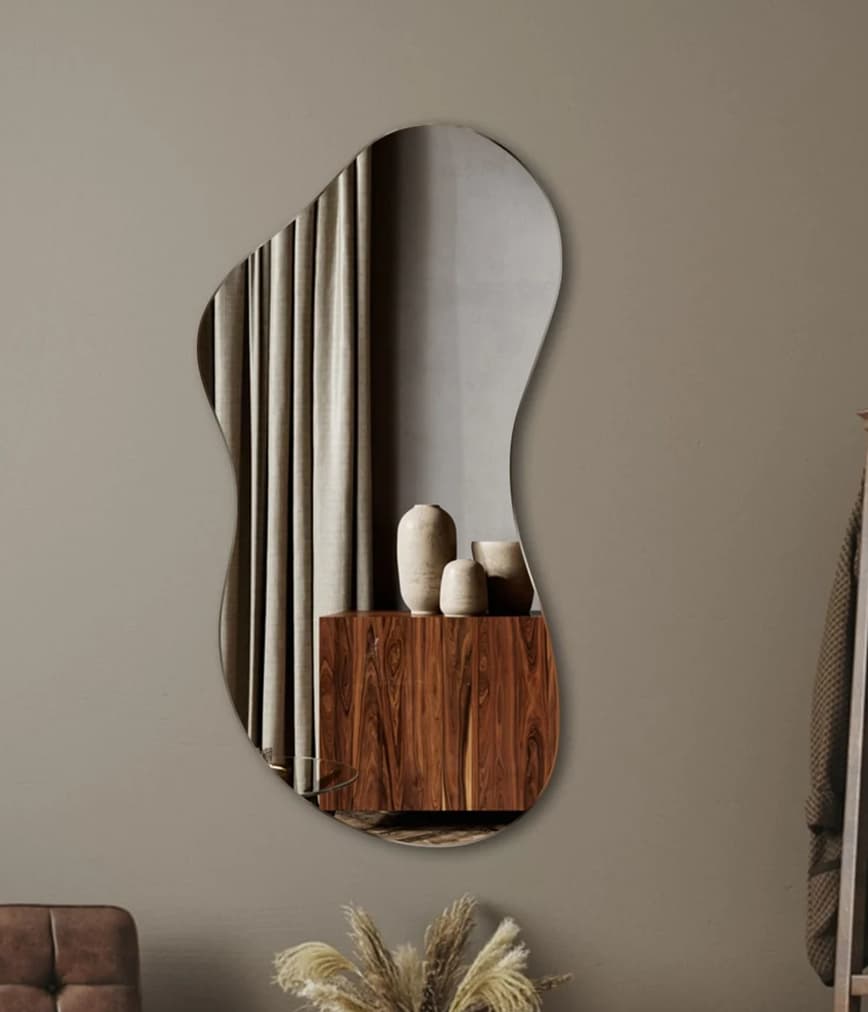
Scoring curved lines is tough- I would suggest using Tarkin in several fast passes to score it. That’s pretty much guaranteed to work well. The thermal crack cutting pass is what may be tricky, but you can revert to hand-nipping there.

You can also score lines to edges that you plan to nip through.

Tarkin would be a good choice because it doesn’t have a min-power limitation.

In Lightburn, I would use one layer for the closed path of the intended project, and under layers, select “number of passes” and try like 10 fast passes. It might do well with 40-50 passes, ultimately. That way, it will only have one start-stop point and mostly keep looping around without stopping, creating minimal discontinuity. Then do trim-score lines in another layer.

As for settings, just a shot in the dark, maybe 100% power 800mm/s speed. We want to etch the surface just like doing glass bottles on the rotary, but we don’t want to build up a lot of heat in the path and crack the glass

That’s assuming it is in fact a large item like the mirror depicted. The smaller the item, the less cooldown each point has before the beam comes around again, and it may overheat and crack. Smaller pieces might require a different strategy, like maybe 5 etching passes, then wait a minute to let it cool down and run it again. This may be something to think about when drawing straight score lines from edge to edge of the glass stock to get to the intended product line. Those may be short. It’s ok if there’s a lot of score lines in one layer, but not if it’s running a few short lines in rapid succession.

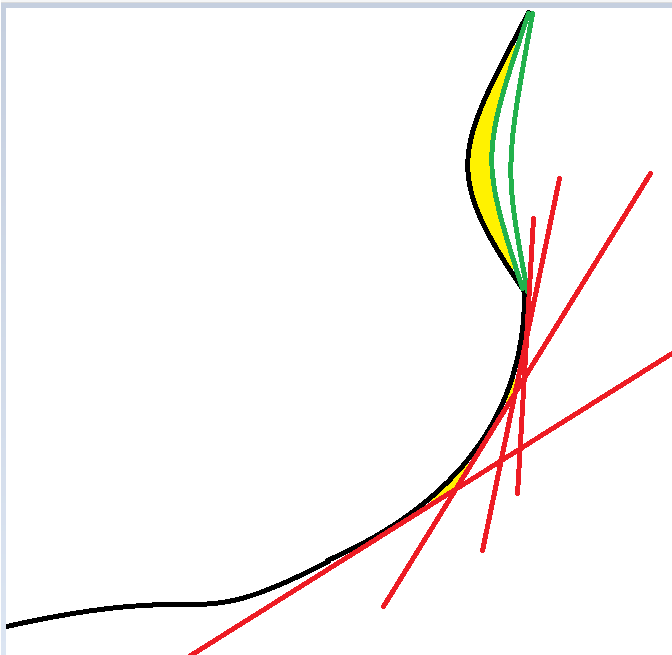
But, like I say, after some scoring passes, if it does crack, it might follow the score line and do the whole job for you. Straight lines are more likely to propagate along a score line than a tight radius curve (like maybe under a 50mm-100mm radius? Just guessing here)

Either way, you’re going to want a water-cooled diamond grinder wheel to polish the edges after cutting.

I have all the tools to try it by hand if you want, from stained glass. I would be interested in making something like that too, so if you wanna source a few mirror panels (I’d buy a couple off of you too) then I’d be willing to bring em to the space and try it out with you if you want to.

1 Like

It would be fun to try on the laser, but its definitely possible to score curved lines on glass, considering its done all the time for stained glass. I’m talking something like this, where you take off bits and pieces and then you can use the grinder to clean up the yellow bits (exaggerated)

1 Like

And you’d make the same score lines on the laser. Probably score the main design line first, then the straight red edge to edge lines to get close to it.

It would be difficult to realign well enough to add more scoring if you take it off the bed, so kerp doing scoring passes until you’re confident you’ve got enough before taking it off.

Like I say, the consequence of doing “too many” scoring lines is it might break on the score line anyways and do the work for you. But you’d want the straight clearance lines to break first, if the main design line starts breaking first it might leave the line and crack in the wrong direction

1 Like