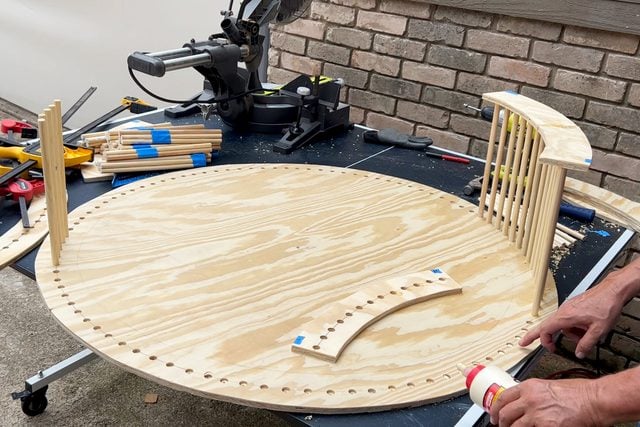
Hey all, new member here. I’m looking for advice on how best to hold and glue the 36 1-foot-long dowel rods for my project without playing pick-up-sticks. I’m open to altering the project slightly, but the gist is I’ll have a plywood circle 36” in diameter and 1/2” thick with ~36 holes (round indentations 1/4” deep) evenly spaced around the perimeter, and I need to glue a dowel sticking out of each hole. The other end of each rod will insert into a similar hole in a plywood ring so its open in the middle for a cat to get in. The rods will be covered with a strip of carpet forming a nice exercise wheel for my new kittens. After I get past this step, I’ll put it on bearings and mount it to a base.
I’m following this tutorial with slightly smaller wheel and dowel diameters. Here’s an illustration from the tutorial – except – they segmented the ring to make it easier to clamp and glue. I’d rather keep it all in one piece if I can.
I’m planning on using the large CNC Router to cut the circle and ring out of plywood and pocket out the 3/4” rod holes.
I have a few (good? bad?) ideas to stabilize the rods while the glue is drying, but I need help figuring out a good way to do this with minimal frustration. Here’s what I’ve thought of so far:
Making the holes go all the way through the plywood (instead of half way as in the tutorial) to give the rods a tighter fit.
Using a cardboard disk with the same hole pattern as a temporary spacer seated halfway between the circle and the ring.
Since I’m almost a total noob to woodworking, I’d love to hear y’all’s advice on how to get this glued up. PS: I haven’t cut anything on the CNC yet, so I’m open to minor modifications to the plan.
Hopefully, I’m explaining my question adequately. Feel free to ask me to clarify things.
I’d go with the cardboard disc. Maybe even two of them, so that you could insert the dowels into both of them, making them lined up and ready to glue into the wood pieces.
I agree with you and @sneezix - one or more laser cut cardboard rings. But…
I see that your current design has only a back support and the wheel’s weight is cantilevered out in front. I think with the weight of the plywood along with your furry friend inside will cause the wheel to flop down and rub on the back support and not work very well.
Doing a search for cat wheel I don’t see any using this approach. Instead they all use a bottom support with a donut-shaped wheel (see picture) and a cradle approach using something like roller-blade wheels and bearings.
So you might consider this alternative design, which, as you see above on the right, has fewer support poles to keep the overall weight down so your furry friend can get it moving more easily. In other words, keep the mass of the wheel to the very minimum, for example, use 1/4” plywood and other light materials.
P.S. You can groove a plywood track piece regularly on one side to allow it to bend so you can form it into a circle instead of using hundreds of dowels.
You can groove a plywood track piece regularly on one side to allow it to bend so you can form it into a circle
Hey, I didn’t know that. Feel free to reply or DM me with more details, or I’ll see what Google/AI can tell me.
The design you’re suggesting is the One Fast Cat, which I’ve owned in the past, but I didn’t like it because it requires a fair amount of force to keep it spinning compared to a central pivot wheel (which I’ve also owned in the past). You’re right about the cantilever issue, though. This tutorial seemingly gets around it by using a bearing assembly lower down the main support.