Again mining the ASMBLY brain trust… any specific recommendations or tips for alcohol dyes? I’m specifically looking for bright, high intensity colors for a set of medallions cut out of baltic birch (or similar plywood). We’ll probably make ~50 of them eventually, in various colors, so easy consistent application is also part of my hope. Finally, we’ll need to be sure these are finishing in a way that is pretty durable and weather-proof (ish).
@valerie, I seem to remember you doing some pieces with alcohol dyes awhile back? Any good lessons learned?
Have you tried working with a Sharpie? They are alcohol ink! I did try the products Valerie was using, but can’t remember the brand. If you do end up also going that route, remember to put down protective plastic! That stuff goes everywhere!
Yes, I have done some experiments with sharpies on wood, but I find it can be a bit hard to control streaks/edges and the sharpies don’t last terribly long (sometimes the tips break down before the reservoir is actually out, I think).
I am very interested in this as well so I’d love to mine any lessons learned from others. I have traditionally been using spray paint on my laser mandalas and would like to try something new/better.
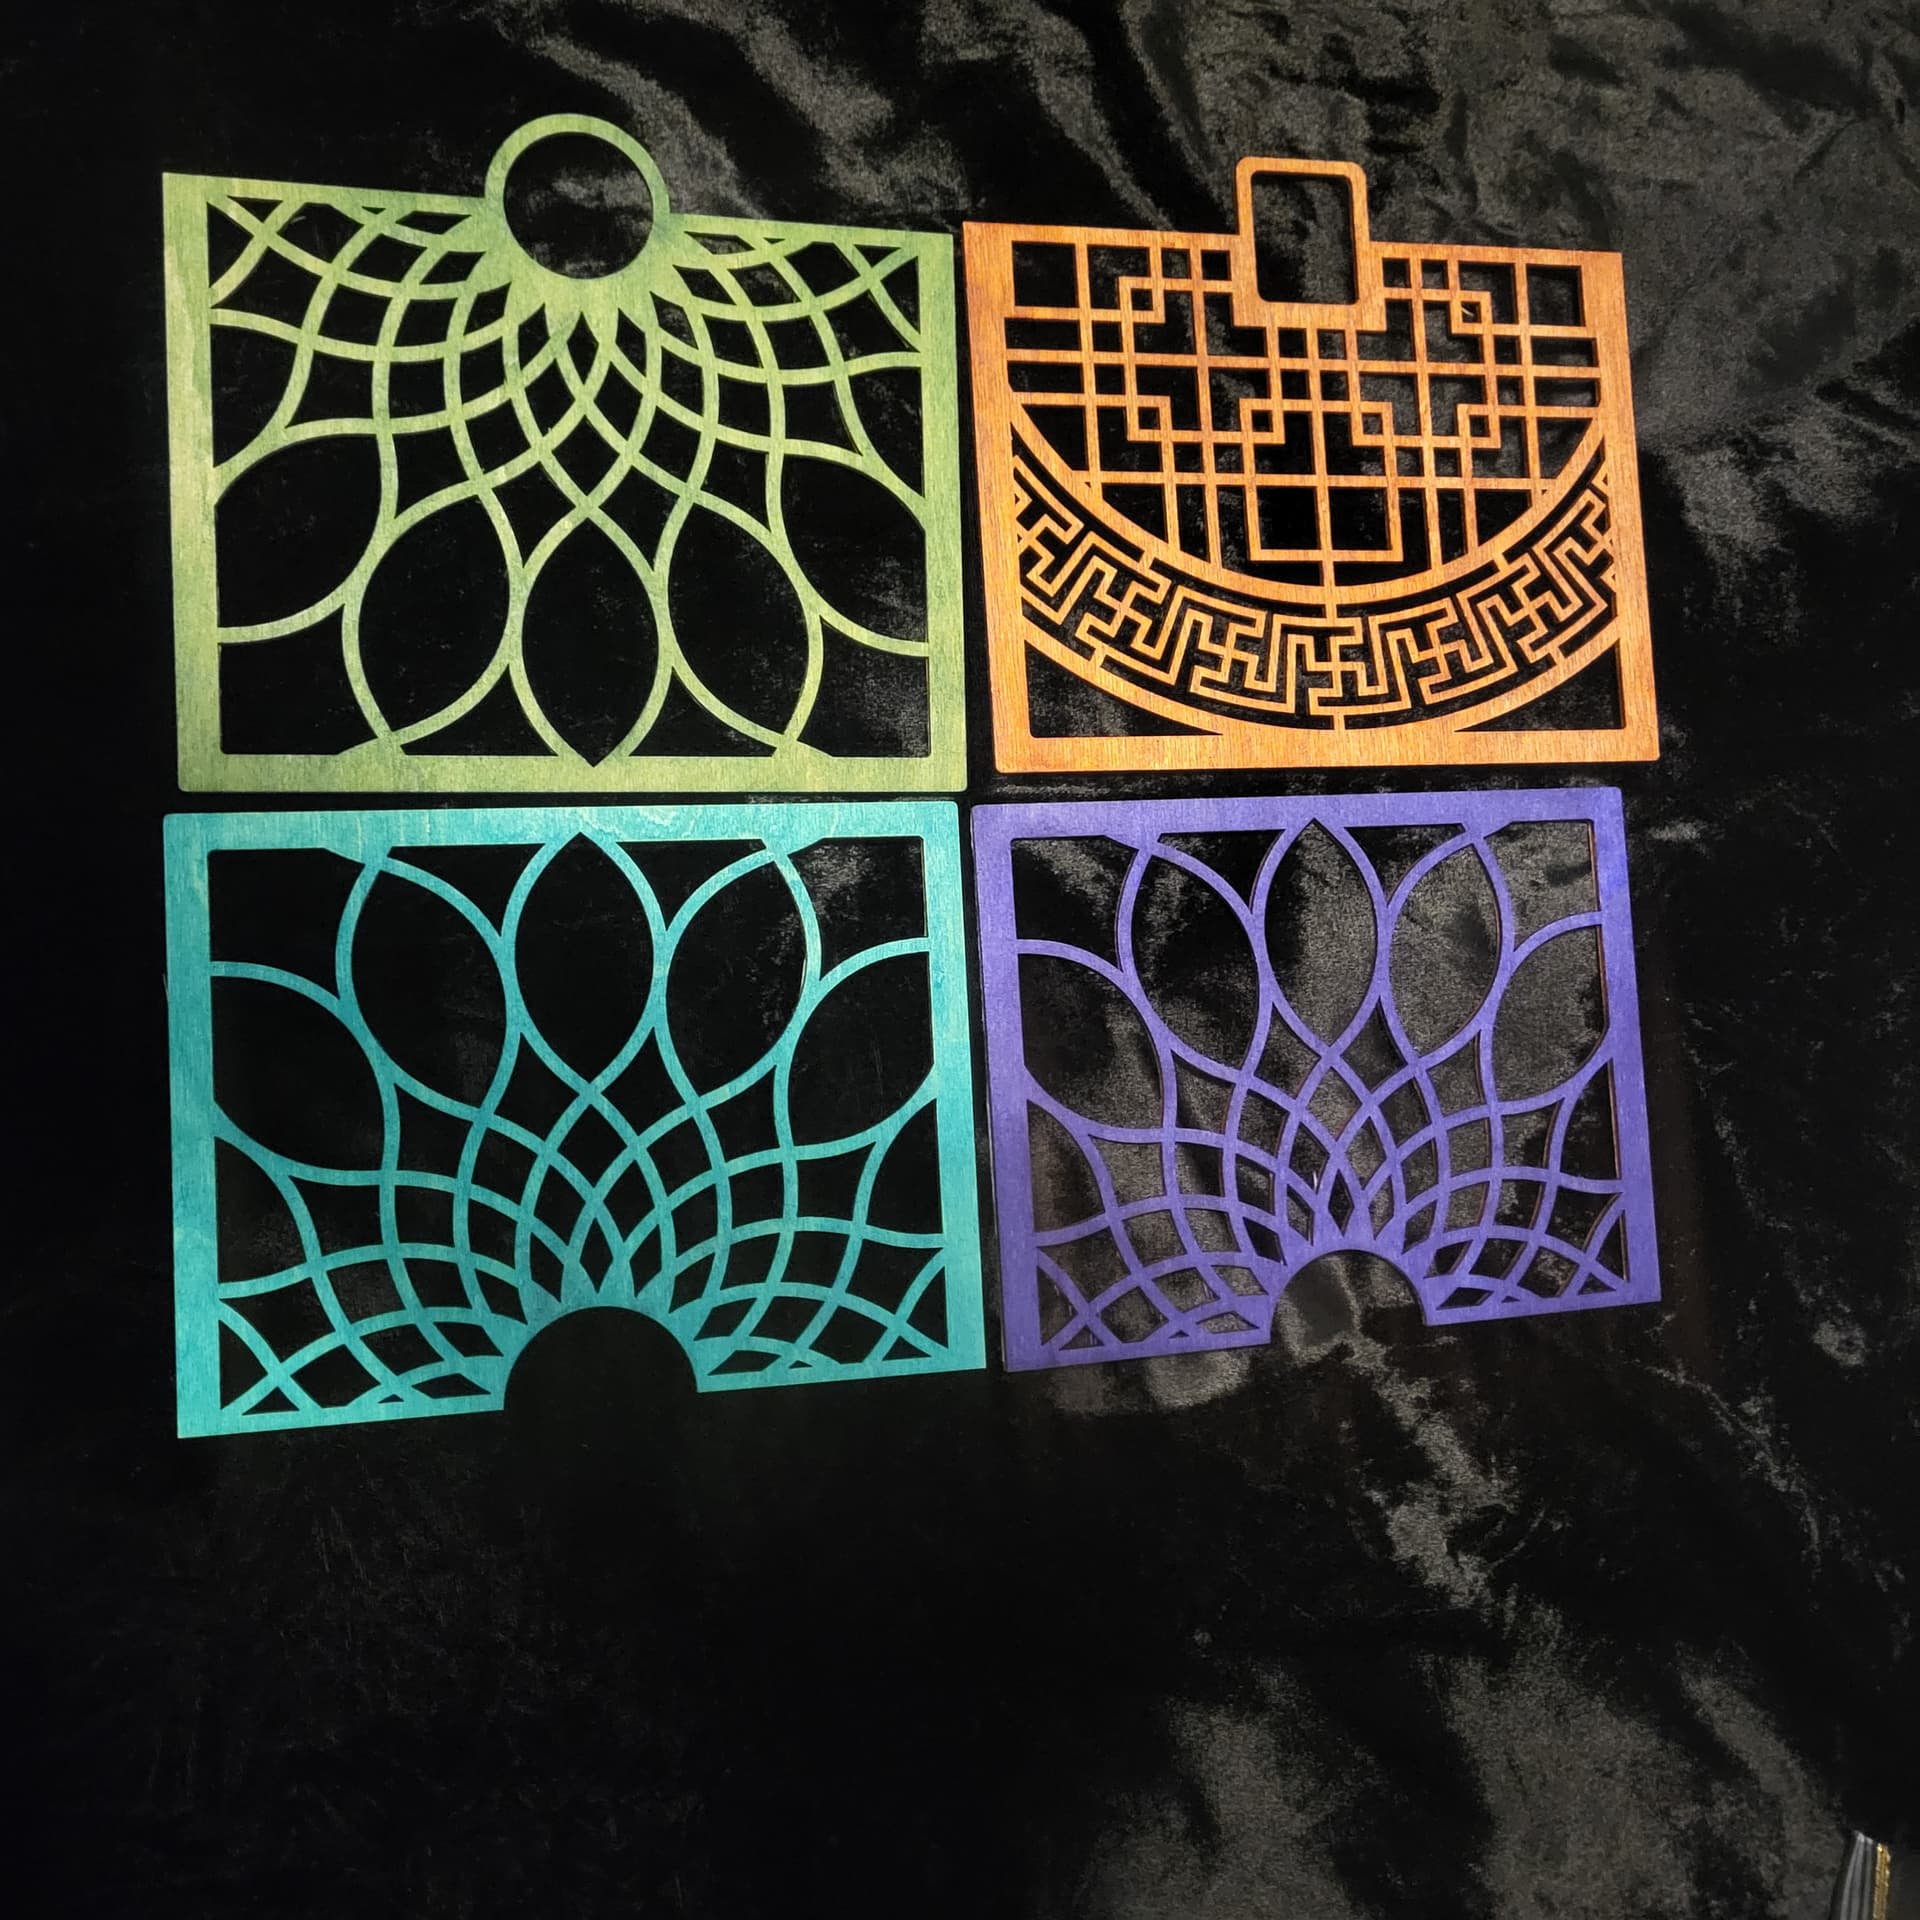
Transtint mixed with denatured alcohol. About 3oz dye to 12-16oz of alcohol. Applied with a acid brush that i cut the bristles down to 3/8"( sometimes you may have to use two or three coats) gives me rather vibrant colors on 150 grit sanded baltic birch. I have considered using an artist air brush but have not tried it as i can not justify the cost. A sample:
Sometimes you may have to use a clear coat to actually see the vibrance usually yellow, orange and green. If you use laquer, you cand apply more coats it will melt into the laquer. If the color is to intensive you can use a rag dampened with alcohol, wipe the substrate and it will take some of the applied dye. Good luck!
I’ve been buying mine at Jerry’s Artarama — they often have great sales and are a long time local art store in town that I love supporting. The alcohol inks I’ve primarily been getting are Artfinity because they are Jerry’s employees’ favorite and generally a better price per mL than the more popular Tim Holtz ones (Artfinity is 25 mL per bottle, Tim Holtz is 15 mL, prices are about the same per unit). Form factor is a little more annoying with Artfinity because they are tippy. I’ve been thinking about making a little holder jig for them. This matters because when you’re working with them, you often want to have the lids unscrewed but sitting on top to keep it covered so you can grab it and use them quickly (remember, alcohol based so evaporates and dries quickly).
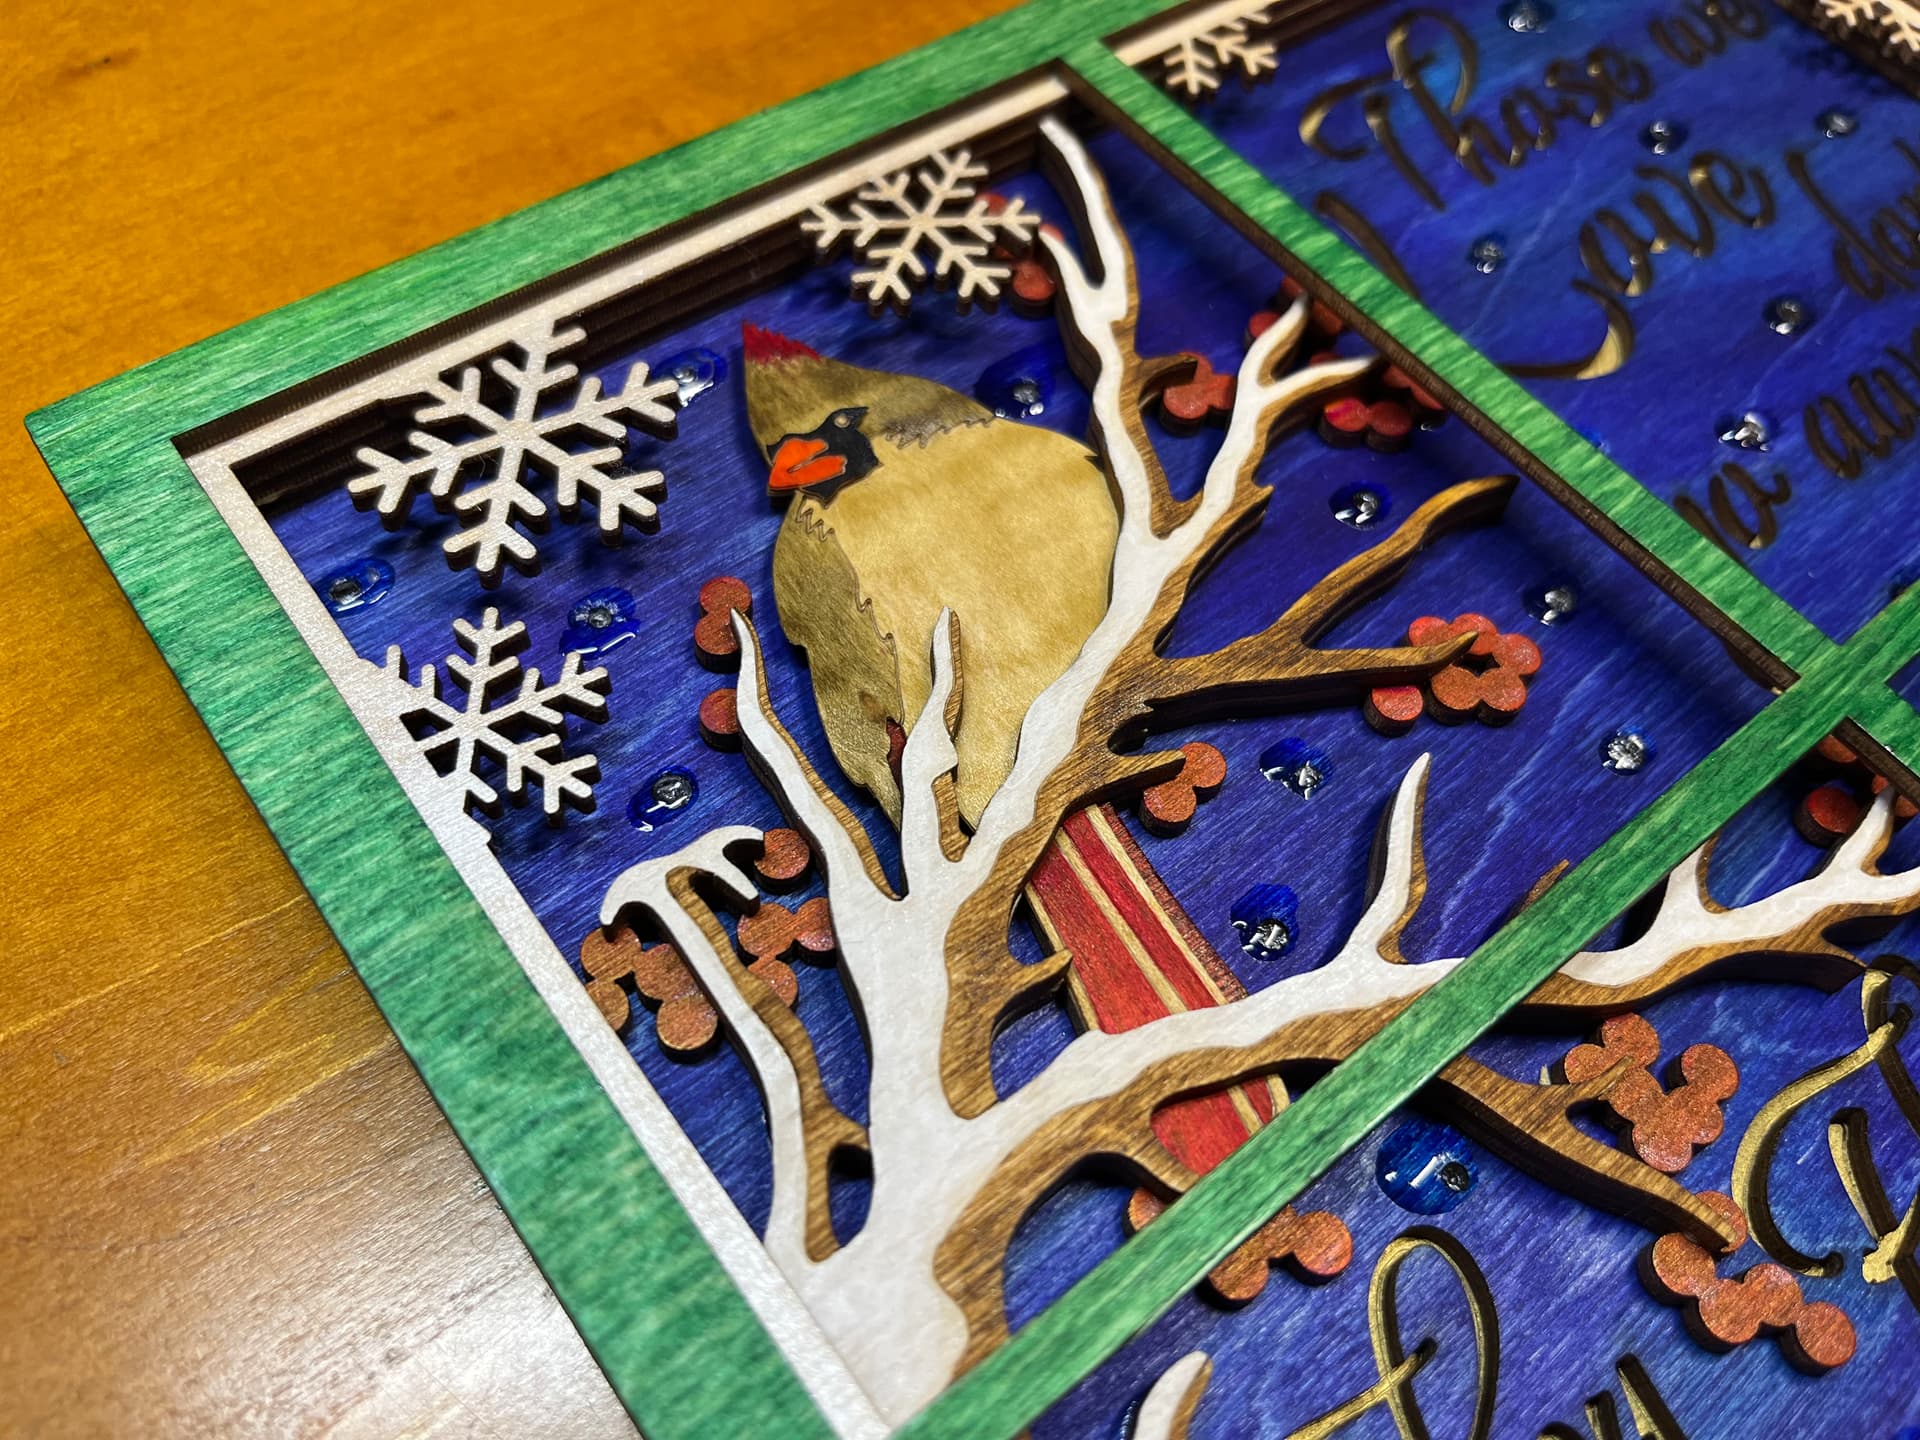
This post shows a pretty wide variety of them in use from some recent projects — Share your projects - Gift Edition 🎁 - #4 by valerie. The deep blue background is a single layer but two different blues applied together with a felt pad. The millennium falcon was done with metallic alcohol ink (as well as a few other parts in the bird ones) so it isn’t as translucent and hides the wood grain more. The thing that I love the most about alcohol inks is that you get vibrant colors saturated into the wood without losing the beauty of the wood grain and they are quick to apply and dry. They are FANTASTIC on curly maple as you can see from that lobster and cardinal birds.
I might do a demo sometime soon showing what I’ve learned thus far and giving people an opportunity to play with them. They are a lot of fun and work well on many different mediums. I’m a big fan
One more follow-up question: any experience with combining alcohol dyes like this along with etching/raster burns? Specifically, I’m wondering about combining with the borax or baking-soda techniques described here: Borax for Darker Etches
For the current project, what I really want is very vibrant foreground colors with a dark grey/black background… ideally with a minimum amount of detail work per item since I’m mass-producing medallions. As much as I like the alcohol dye idea, I’m a bit concerned that the colors will seep down into the wood far enough to make clean raster etching maybe not work super-well. FWIW, I’m currently thinking that my medallions will be made of 1/8" baltic birch.
It definitely penetrates deep into the pores. For the layered cardinal window piece I did, I had an etch line that worked well at cutting the fibers and creating a barrier for the color, but only with also painting the ink lightly rather than applying it a bit more fast and loose (i.e. maybe not ideal for large scale production). The snow capped tree branches is where that is. Both sides painted with alcohol ink and without that etch line they definitely would bleed.
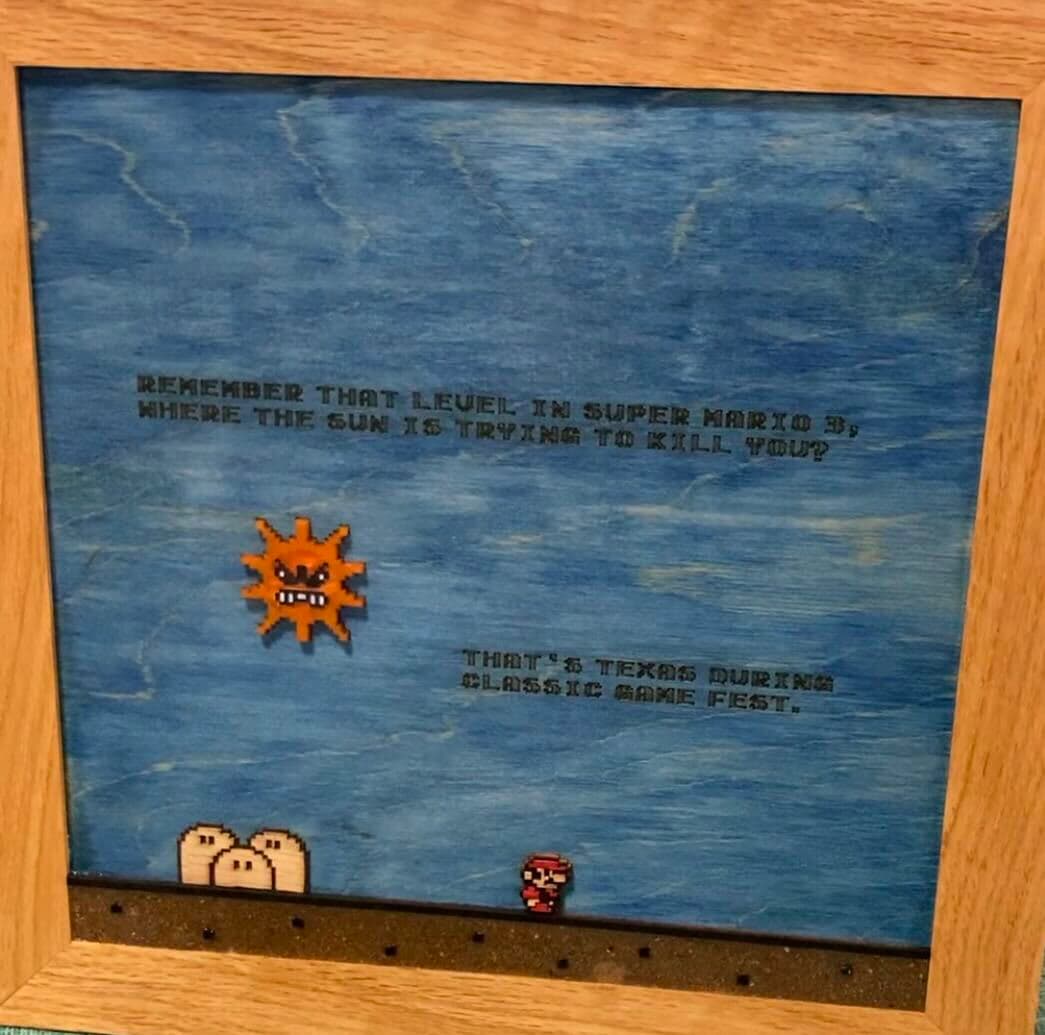
With rastered areas, I think your results may vary depending on the color you use. I didn’t want super high contrast in this Mario meme one I did, so it worked fine for my use case. When I was doing test pieces for that, there were some samples that maintained more contrast than others.
For the most part if you have a good raster etch the dyes will not change the lasered area. If you are concerned about consistency then it will require far more work than youre anticipating. Dye and clear coat the substrate. Once is set, mask then laser, then apply either black or any color paint (to include acrylic brush on), let dry, clean your mask. If you have an intricate graphic this may not be possible. Another product you can use is Laser Dark, http://www.laserdark.com/ but it requires the same process. You could use copier toner, apply toner powder distributing all over the reccessed lasered parts with a brush, clean powder as much as you can of the flat higher area, spray a clear coat on the item. This will set the toner. Sand item to get rid any toner left on the flat higher area. Dye item and clear coat. The less labor would be to just cut and raster your item, sand with 150 grit, dye and then clear coat. If you apply the dye evenly throughout you should have a presentable professional product. If you want to apply different colors, the bleeding part is going to be rather hard to prevent.
I second transtint for vibrance, and you can mix it with shellac and apply it with an airbrush. This keeps it from soaking in as much, but gives a lot of control over the color, and is one of the ways I apply sunbursts to a guitar.
Fiebing’s leather dye from tandy can’t be beat for convenience(use straight from the bottle). It’s great on wood, and a lot of luthiers use it. My friend just used the Feibing’s purple on a bass guitar, if I wasn’t on a new account, I’d share a picture.
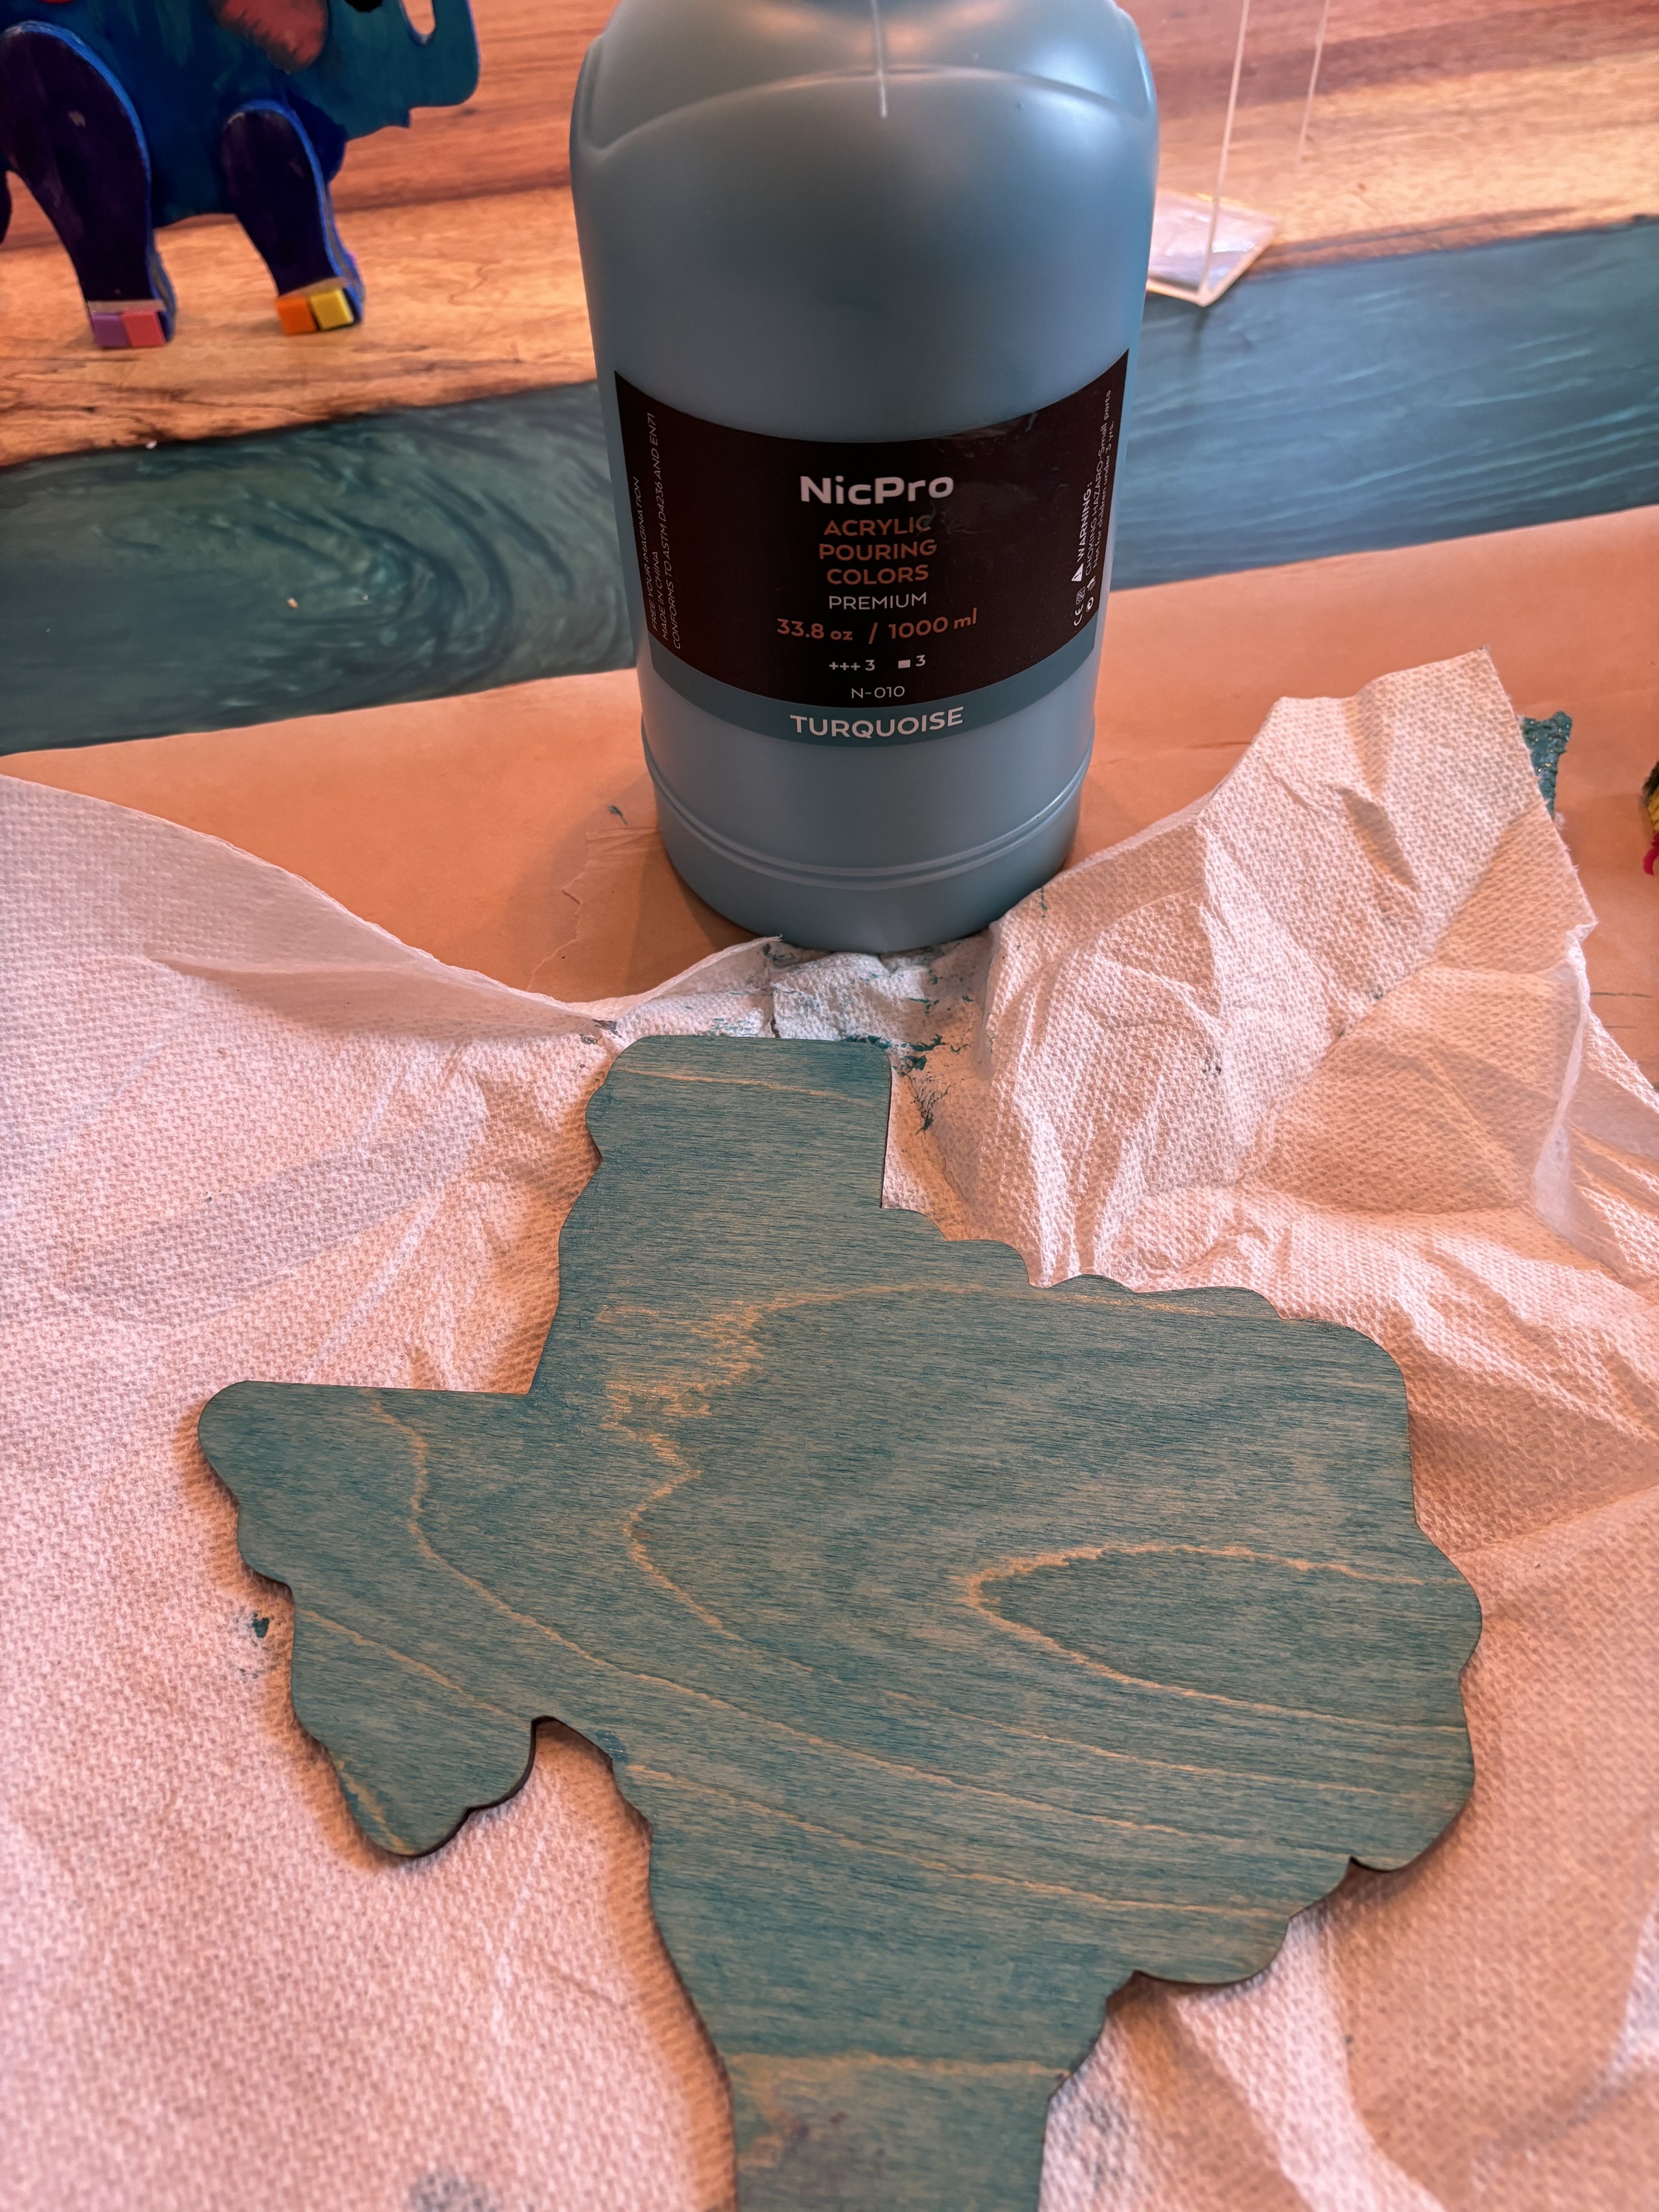
I just experimented with some acrylic pouring paint I had on hand (essentially it is normal acrylic thinned out with pouring medium) and got a decent outcome. Key was applying with a mostly dry sponge in the grain direction. Waited 30 seconds then wiped off with a paper towel.